Code Completion Design
How to build
Get the source code
When you download the svn source code of code::blocks,(see here Installing_Code::Blocks_from_source_on_Windows#Code::Blocks_sources the source code of CodeCompletion plugin was already included.
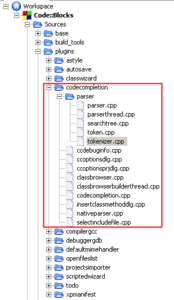
Here is the screen shot when I opened the codecompletion source code in C::B's source navigator view.
Build the code completion plug-in
If you only want to build the Code Completion plug-in, you can select it in the "build target list" (Note: by default, the Build target option was "ALL", which means all the targets in the current workspace will be build), see the screen shot below:
Don't forget to run the batch script file "update.bat" after you build the target, this procedure will update your output folder package and strip the debug information. See the wiki page Installing_Code::Blocks_from_source_on_Windows for more information.
A brief description of every project files
From now on, we use CC as an abbreviation for code completion plug-in.
| ccdebuginfo.cpp | a dialog for debugging CC, can be opened by double click on the code browser tree entry with shift and ctrl key pressed |
| ccoptionsdlg.cpp | code completion options dialog, can be opened by menu->setting->editor->code completion and symbols browser |
| ccoptionsprjdlg.cpp | setting the additional parser search path |
| classbrowser.cpp | viewing the symbols tree ctrl(token tree). |
| classbrowserbuilderthread.cpp | a thread to build the class browser tree above |
| codecompletion.cpp | The Main file need by code completion plug-in, maintain all the CC's GUI and native parser |
| insertclassmethoddlg.cpp | a dialog to insert class method, can be open by context menu in editor |
| nativeparser.cpp | a class derived from wxEvtHandler, NativeParser class has a member variable "Parser m_Parser"; |
| selectincludefile.cpp | select multiply matched token names before any jump to declaration or jump to implementation. |
| parser/parser.cpp | Parser class was also derived from wxEvtHandler, can start batch parse... this class has member variables like :cbThreadPool m_Pool(which will create a thread from thread pool for each file need passed);TokenTree* m_pTokens(contains all the Token database); |
| parser/parserthread.cpp | will do the syntax analysis for every file in a project, it has a Tokenizer as member variable |
| parser/token.cpp | definition of the "Token" class, and TokenTree(which means the Token dababase) |
| parser/tokenizer.cpp | tokenizer will return every wxString it regard as a symbol by GetToken(), also do a replacement before return |
| parser/searchtree.cpp | implement the patricia search tree using by TokenTree |
| Header files | no description needed |
Structure of CodeCompletion plugin
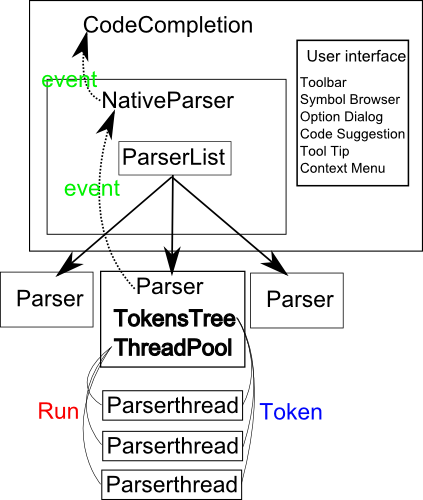
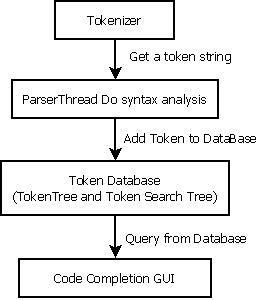
The above image show the main structure of our CodeCompletion plugins. The main class are:
- CodeCompletion: this is the class for main plugin), it handle event sent from the C::B core. Toolbar handling was done in this class.
- NativeParser: as a main member variable of the CodeCompletion class, this class is like the Parser manager class, it create/delete Parser instances when a project load/closed.
- Parser: this class is mainly for handling Tokens. Parser class hold a TokenTree which record all the Tokens. Parser class also hold a thread pool, it can either run the parsing task in the pool(this means the parsing task will be done in a separate thread), or directly by a function call.
- Parserthread: The class derived from the worker thread(cbThreadedTask class), it member function DoParse() is the function for parsing.
Besides that, when trying to show the suggestion list(auto completion list, or code completion list), the NativeParser need to analyze the current the current statement structure, and query the symbol(token) information from the Tokentree, this is mostly done in ResolveExpression() member function.
Some important note: when all Parserthread instances finish parsing job in the pool, the thread pool will send an event to its parent(in this case, it is the Parser class), so the Parser know that the parsing is done, or the Parser can assign another parsing jobs to the thread pool.
Low level parser(Lexical analysis, Tokenize)
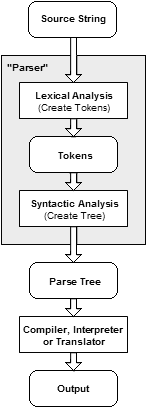
For someone haven't heard what does "Token" and "Tokenize" mean, you should read the wikibooks article A brief explain of what does a parser do and Tokenize on wikipedia. Shortly, a Tokenizer regards your C++ or C source code as a large array of characters (sometimes, we call it a string), then this big string can be divided to small atomic strings----a token (Each token has a unique meanings and can't be divided into sub-strings. A token can be a symbol, an identifier, a keyword, a digital number, etc), meanwhile "white spaces" and "comments" were ignored by the Tokenizer.
for a simple c++ program like below
int main()
{
    std::cout << "hello world" << std::endl;
    return 0;
}
After tokenizing, it should give these 15 tokens
1 = string "int"
2 = string "main"
3 = opening parenthesis
4 = closing parenthesis
5 = opening brace
6 = string "std"
7 = namespace operator
8 = string "cout"
9 = << operator
10 = string ""hello world""
11 = string "endl"
12 = semicolon
13 = string "return"
14 = number 0
15 = closing brace
Tokenizer class
A class named Tokenizer was implemented in "tokenizer.h" and "tokenizer.cpp". Seen from the Tokenizer's level, a token is just a unicode wxString. There are several steps to run an instance of Tokenizer.
preparing the big string
From the previous section, you know the Tokenizer is just a string cutter. So, the first step is preparing the big string. The string can either be loaded from a source file or a memory buffer. Currently, the Unicode wxString is used.(since we are all using Unicode build of code::blocks, and ANSI mode is outdated and deprecated).
Get or Peek a token
Tokenizer contains a file position indicator----m_TokenIndex(see File Open In C language) pointing to the current position of string. So, you can Get a token or Peek a token. Here is the function prototype
    //Get the current token string started from m_TokenIndex,
    //After that, increase the m_Tokenindex
    wxString GetToken();

    //Peak the current token string and but do *NOT* increase the m_TokenIndex
    wxString PeekToken();
For example, if the Tokenizer parses the example code above, you can see how these two methods work.
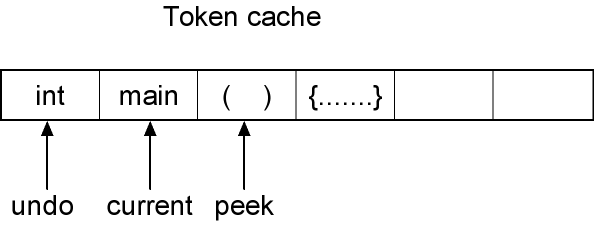
- After initializing the Tokenizer(preparing the big string), You firstly call the GetToken() function, which will return the first token "int" and increase the m_TokenIndex one step to "int".
- Then, if you call the PeekToken(), which will return a token "main", but the tokenindex was still remaining point to "int".
- If you call the GetToken() again, it will return a "main" immediately and increase the file pointer to "main".
Note: Internally, the Tokenizer class use a undo and peek cache to do the trick. Once a token is peeked, it is saved in m_Peek member, so, next time you call GetToken(), it just immediately return the cached value without calling the "DoGetToken()" procedure again.
Nested Value of braces
As you know, braces are exist in pairs, such as "{" and "}", or "[" and "]", Also, these braces can be embeded. So the Tokenizer keep a value m_NestLevel to indicate how deep you stays. If the Tokenizer meets a {, it will increase the nestValue, and if it meets a }, it will decrease the m_NestLevel. See the pseudo code in Tokenizer.cpp below:
        if (CurrentChar() == '{')
            ++m_NestLevel;
        else if (CurrentChar() == '}')
            --m_NestLevel;
SkipUnwanted tokens
A bool member variable m_SkipUnwantedTokens determines whether a regular assignments statement will be omitted or not. For example, a piece of code below:
a = b + c;If m_SkipUnwantedTokens == true, then once SkipUnwanted() meets the "=" symbol, it will go on skipping every characters until it meets , or ; or }, so this statement will be omitted by the Tokenizer.
Sometimes, this behavior becomes a nightmare when parsing the statement like default argument in template. Or the default arguments in function.
// assignment statement in template arguments
template<class T = int>
class abc {
 T m_a;
 ......
 ......
}

// assignment statement in function arguments

void foo( int arg1 = 60 )
{
    bla bla;
}
If the Tokenizer finds that an equation sign =, it will skip any character until it meets a }, so, the class declaration or function body will be totally skipped in the unexpected way. In this case, we should manually disable this functionality by setting m_SkipUnwantedTokens = false to let the Tokenizer parse these statements correctly.
That's why you will see many situations when you enter a function, you should save the m_SkipUnwantedTokens statues and disabled it, when you leave a function, you should manually restore it.(See function implementation in ParseThread.cpp)
Return a correct token, Macro replacement
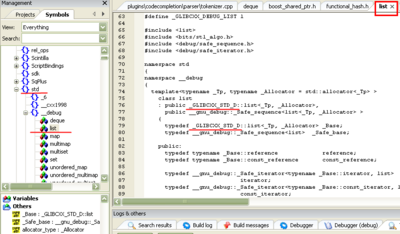
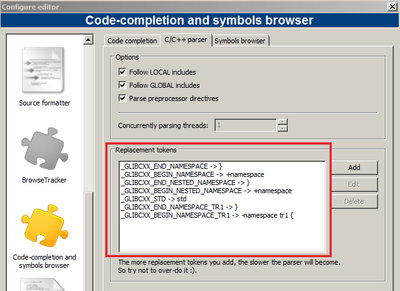
Special token should be replaced for parsing correctly. For example, in the standard c++ header (mingw), there are a string named "_GLIBCXX_STD", this should be replaced to "std". See the dialog below.
The inline function in the Tokenizer class will check whether a token should be replaced before return.
wxString Tokenizer::MacroReplace(const wxString str)
{
    wxStringHashMap::const_iterator it = s_Replacements.find(str);

    if (it != s_Replacements.end())
    {
        // match one!
        wxString key   = it->first;
        wxString value = it->second;
        TRACE(_T("MacroReplace() : Replacing '%s' with '%s' (file='%s')."), key.wx_str(), value.wx_str(), m_Filename.wx_str());
        if (value[0]=='+' && CurrentChar()=='(')
        {
            unsigned int start = m_TokenIndex;
            m_Buffer[start] = ' ';
            bool fillSpace = false;
            while (m_Buffer[start]!=')')
            {
                if (m_Buffer[start]==',')
                    fillSpace = true;

                if (fillSpace==true)
                    m_Buffer[start]=' ';

                start++;
            }
            m_Buffer[start] = '{';
            return value.Remove(0,1);
        }
        else if (value[0] == '-')
        {
            unsigned int lenKey = key.Len();
            value = value.Remove(0,1);
            unsigned int lenValue = value.Len();

            for (unsigned int i=1; i<=lenKey; i++)
            {
                if (i < lenValue)
                    m_Buffer[m_TokenIndex-i] = value[lenValue-i];
                else
                    m_Buffer[m_TokenIndex-i] = ' ';
            }

            int firstSpace = value.First(' ');
            // adjust m_TokenIndex
            m_TokenIndex = m_TokenIndex - lenValue + firstSpace;

            return value.Mid(0,firstSpace);
        }
        else
            return value;
    }

    return str;
}
Setting the replacement mapping. Note that before return a token, a replacement map was searched to check if it matches any entry in the map, so, the bigger this map goes, the slower it will do parsing.
Note: Code Completion plug-in is not a preprocessor, so it is difficult to deal with the source mixed with many macro, or some strange macros. This is something like Ctags' replacement options "?I identifier?list" in ctags option detial or Code Completion macro FAQ
For discussion of Ctags, the related thread is [/index.php/topic,10564.msg72424.html#msg72424 Re: namespaces and code completion] and [/index.php/topic,11187.msg77135.html#msg77135 Re: New code completion remarks/issues]
replacement rules
directly replacement AAAAA -> BBBBB
You can define a rule: AAAAA -> BBBBB
Which means, if the tokenizer meet a string "AAAAA", then it will returned a string "BBBBB"
directly replacement AAAAA -> Empty String
You can define a rule: AAAAA -> Empty String
The token "AAAAA" is skipped when parsing.
AAAAA -> +BBBBB
For example, when
_GLIBCXX_BEGIN_NESTED_NAMESPACE(std, _GLIBCXX_STD_D)

  /// See bits/stl_deque.h's _Deque_base for an explanation.
  template<typename _Tp, typename _Alloc>
    struct _Vector_base
    {
      typedef typename _Alloc::template rebind<_Tp>::other _Tp_alloc_type;


    ......

_GLIBCXX_END_NESTED_NAMESPACE
We should replace the string "_GLIBCXX_BEGIN_NESTED_NAMESPACE(std, _GLIBCXX_STD_D)" to "namespace std {", here, we introduce two replacement rules:
| _GLIBCXX_BEGIN_NESTED_NAMESPACE | +namespace |
| _GLIBCXX_END_NESTED_NAMESPACE | } |
In this rule, we firstly replace the "_GLIBCXX_BEGIN_NESTED_NAMESPACE" with the "namespace", then, we reserve the "std", and change the closing parenthesis to an opening brace. (See the image above), also, every token string "_GLIBCXX_END_NESTED_NAMESPACE" will be replaced by "}".

So, the code becomes to like below:
namespace     std   {

  /// See bits/stl_deque.h's _Deque_base for an explanation.
  template<typename _Tp, typename _Alloc>
    struct _Vector_base
    {
      typedef typename _Alloc::template rebind<_Tp>::other _Tp_alloc_type;


    ......

}
AAAAA -> -BBBBB
For example, when
_GLIBCXX_BEGIN_NAMESPACE_TR1
...
...
_GLIBCXX_END_NAMESPACE_TR1
We should replace the string "_GLIBCXX_BEGIN_NAMESPACE_TR1" to "namespace tr1 {", here, we introduce two replacement rules:
| _GLIBCXX_BEGIN_NAMESPACE_TR1 | -namespace tr1 { |
| _GLIBCXX_END_NAMESPACE_TR1 | } |
In this rule, we firstly replace the "_GLIBCXX_BEGIN_NAMESPACE_TR1" with the "namespace", then, add aditional string "tr1 {"
So, the code becomes:
namespace tr1 {
...
...
}
AAAAA -> *
In this case, we call it a "strip the next "(" and ")" rule. for example:
The rule syntax is:
XXXXXX -> *
For example, In the source code below:
CVAPI(void) cvFxxxx();
CVAPI(cvMat *) cvFyyy();
will become to (if I add a replacement rule CVAPI -> *)
void cvFxxxx();
cvMat * cvFyyy();
AAAAA -> @
With this rule, you can trigger the tokenizer to work in macro replacement mode, so if you have the code
#define	_EXFUN(name, proto)		name proto

FILE *	_EXFUN(fopen, (const char *__restrict _name, const char *__restrict _type));
You can add a rule _EXFUN -> @, so that the tokenizer will go to macro replacement mode if he see a _EXFUN. See details in [/index.php/topic,19278.msg131810.html#msg131810 Is it possible for the parser to support newlib prototypes?]
High level parser(Syntax Analysis)
This is the main flow of a parser.
parser thread
Basically, we can say, the low level parser(Tokenizer) moves its pointer character by character, and return a wxString(token) to feed the high level parser(Syntax analyzer).All the syntax analysis was done in ParserThread. A thread must be created to parse a source file. see parserthread.cpp and parserthread.h, a thread will be allocated from thread pool. For example, a file contains these statement:
    void  f1();
    int   f2(char c);
    float f3(void * p);
    int   f1;
    double f2;
After the ParserThread finished its parsing, it will recognize five tokens, which has the keyword "f1","f2" and "f3", note, tokens can have the same names, but they differ from different types( variables, functions...).
Token class
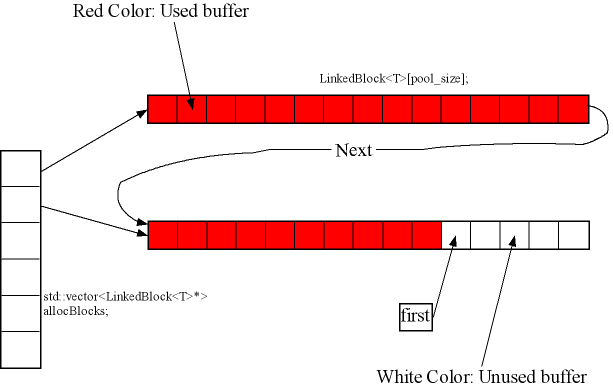
How can a large number of tokens be recorded? A Token(note: it as a capital means it's class type) class was introduced to recorded every token. For boosting the speed of allocating Tokens, the "new" and "delete" operator were overloaded in its base class BlockAllocated. See the memory pool page on wikipedia as a reference.
class Token  : public BlockAllocated<Token, 10000>
{
        ......
        wxString m_Type; // this is the return value (if any): e.g. const wxString&
        wxString m_ActualType; // this is what the parser believes is the actual return value: e.g. wxString
        wxString m_Name;
        wxString m_Args;
        wxString m_AncestorsString; // all ancestors comma-separated list
        unsigned int m_File;
        unsigned int m_Line;
        unsigned int m_ImplFile;
        unsigned int m_ImplLine; // where the token was met
        unsigned int m_ImplLineStart; // if token is impl, opening brace line
        unsigned int m_ImplLineEnd; // if token is impl, closing brace line
        TokenScope m_Scope;
        TokenKind m_TokenKind;
        bool m_IsOperator;
        bool m_IsLocal; // found in a local file?
        bool m_IsTemp; // if true, the tree deletes it in FreeTemporaries()
        bool m_IsConst;    // the member method is const (yes/no)

        int m_ParentIndex;
        TokenIdxSet m_Children;
        TokenIdxSet m_Ancestors;
        TokenIdxSet m_DirectAncestors;
        TokenIdxSet m_Descendants;
        ......


};
You can see the Token class contains all the information needed for recording its locating, its type or class derived hierarchy...
For example, in the source code in[Low level parser(Lexical analysis)]. A Token for "main" should contains it's name (obviously , m_Name="main" ), then m_File will record which file dose this Token exist. m_Line will give the line number of "main" in this source file, and so on.
Memory Pool--BlockAllocated class
In BlockAllocated class, there is only a static member say "static BlockAllocator<T, pool_size, debug> allocator;" to keep all the pre-allocated memory for all derived class.
10000 means a pool of 10000 Tokens were allocated in the memory pool, so, dynamically allocate a Token object will be fast and efficient.
ParserThread
The function Parse() will do the most job of syntax analysis. See the pseudo code below.
ParserThread::Parse()
{
   ......
   do
    {
        ......
        DoParse();
        ......


    }while(false);

    return result;
}
In the DoParse(), it checks the token from Tokenizer. For example, if the token words = "enum", then, the ParserThread::HandleEnum() will do the job to parse this enum block.
A simple look ahead parser
We can explain a little about it parser, the member variable m_Str of class ParserThread will be considered as a type stack, for example, we want to parse the statement below:
symbolA symbolB symbolC symbolD;Only symbolD can be recognized as a variable, and it has a type of "symbolA symbolB symbolC". When the parser meets each symbol, it will look ahead to see the next token is whether ";", if not, the current token will pushed to m_Str. These iteration will be ended when the parser look ahead one step from symbolD and find the next token is a ";".
DoParse Examples
Handling class declaration
The main routing of handling class was in ParserThread::HandleClass function If the parserThread meet these statement
class AAA{
    int m_a;
    int m_b;
} ;
It will surely add a Token of "AAA", it's type is "class".
What about these statements
class AAA{
    int m_a;
    int m_b;
} x,y,z;
The parserThread should firstly add a Token "AAA", then it should regard "x", "y", "z" are three variables of type "AAA". This was done by "ReadVarNames()" function, it will read every comma separated variables after a class declaration.
Handling typedef statement
Sometimes, you can see these code blocks:
typedef class AAA{
    int m_a;
    int m_b;
} BBB,CCC;
If the parser meets the keyword "typedef", firstly it set the "m_ParsingTypedef = ture" to indicate that we are parsing a typedef statement.
Next, it meets a keyword "class", which also indicate it is a class declaration. So, the HandleClass function will do the task. A Token of "class AAA" will be added to the TokenTree. Wait a minute, how can we deal with "BBB" and "CCC", this is not the same case as previous code, we can't regard "BBB","CCC" as variables. In this case, another function "ReadClsName()" will be called. For simplicity of TokenTree, we just regard "BBB" and "CCC" as derived class of "AAA".
How does the parserThread know between these two cases. Here is the code:
                if (m_ParsingTypedef)
                {
                    m_Str.Clear();
                    ReadClsNames(newToken->m_Name);
                    // m_ParsingTypedef = false;
                    break;

                }
                else
                {
                    m_Str = newToken->m_Name;
                    ReadVarNames();
                    m_Str.Clear();
                    break;
                }
That's the whole thing I would like to write about handling class and handling typedef.
TokenTree&SearchTree
Maybe, you would ask a question: where do these Tokens store? The answer is that all the Tokens will be recorded in "TokenTree class".
When a certain Token is identified(whether it's a global variable, a class declaration, a class member function, and so on), it will be inserted to a database(TokenTree).
Furthermore, for fast Token query, Tokens should be sorted by it's wxString m_Name member;
A compact Patricia tree(see the wikipedia Patricia tree on wikipedia) is built to hold all their names.
For example, If you add three item to the TokenTree.
    mytree->AddItem(_T("physics"),_T("1 - uno"));
    mytree->AddItem(_T("physiology"),_T("2 - dos"));
    mytree->AddItem(_T("psychic"),_T("3 - tres"));
The Patricia tree structure will show as below, the edge of a tree contains a "label string" and the number in parentheses refers to a node Id.
- "" (0)
      \- "p" (4)
              +- "hysi" (2)
              |          +- "cs" (1)
              |          \- "ology" (3)
              \- "sychic" (5)
Animation of Patricia tree
A web page gives an animation of building a Patricia tree, you can see how the tree node added. See here Prefix searching with Radix Tree
A better animation demo of Patricia tree can be found in Search Tree Viewer. In this page, you can select the tree type, and enter some strings, then the tree will dynamically show in the window.
SearchTree Node
A Node should contains at least several essential element. They are:
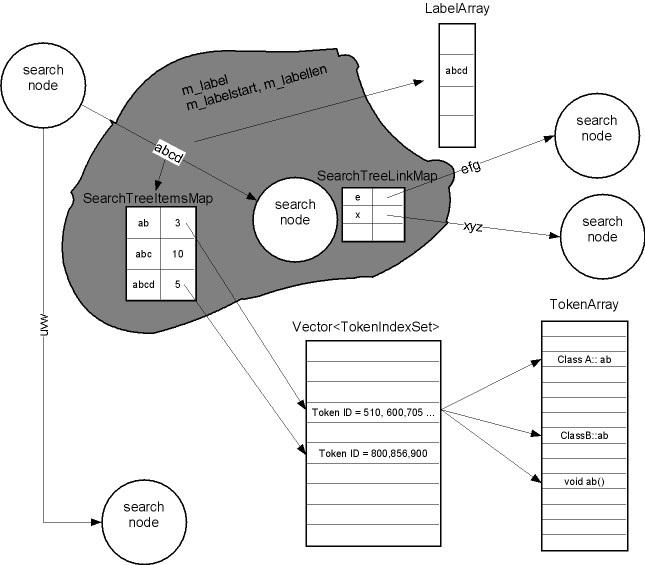
- An edge: in the image below, the gray filled area shows a Node, since each edge belong to the next node, for example, the Node has an edge "abcd".
- SearchTreeItemMap: because our searchTree is a compact Patricia tree which means an edge contains many items. Such as, "ab" , "abc", "abcd" all the suffix string belong to the edge "abcd"
- SearchTreeLinkMap: This is an associated container map<wxChar,NodeId>, which store all "pointers" to its child Node. In the example below, "e" points to a Node of "efg", while "x" points to "xyz".
- Node depth: depth of Search Tree Node is defined by the string length from the "root node". See a depth of each node on the search tree above. For example, the Node of "hysi" has a m_Depth = 5 ("" + "p" + "hysi" = 5).
Node Lable
For example, the node "hysi" (2) has two children, they are "cs" (1) and "ology" (3), show below.
For more information, see the forum discussion here. [/index.php/topic,1696.0.html rickg22's SearchTree development] as a reference.
How a new item is added to the tree
When you add a new key (string) to the tree, some node should be splited, and new node need to be added. For example [/index.php/topic,1696.msg12617.html#msg12617 this post]show some details.
Suppose we have two nodes in the tree, the node id is 0 (root node) and 1, the tree hold only one key string(item) "physics":
Adding word: physics
1 items in the tree
- "" (0)
      \- "physics" (1)
Now, if another key string "physiology" is added to the tree, we now firstly check "physiology" is already in the tree, if not, we need to find the common string "physi", so the node 1 should be splited after the common string, so you get the following result.
Adding word: physiology
2 items in the tree
- "" (0)
      \- "physi" (2)
                  +- "cs" (1)
                  \- "ology" (3)
Here, the middle node "physi" is added. the original node 1's lable is shorten to "cs", and a new node "ology" is added as a new child node to the middle node.
In the other case, the new added item does not cause a new node to be added to the tree, only a node need to be extended by its ledge. For example:
6 items in the tree
- "" (0)
      \- "p" (4)
              +- "aranormal" (8)
              +- "hysi" (2)
              |          +- "cs" (1)
              |          \- "ology" (3)
              \- "sych" (6)
                         +- "i" (9)
                         |       +- "atrist" (10)
                         |       \- "cs" (5)
                         \- "otic" (7)
Now, you add a new item "psychiatrists", pay attention to the node 10 in the above tree, we have already an item "psychiatrist", when the new item "psychiatrists" is added, we can just extend the node 10's edge from "artrist" to "artrists", thus no new node is needed.
7 items in the tree
- "" (0)
      \- "p" (4)
              +- "aranormal" (8)
              +- "hysi" (2)
              |          +- "cs" (1)
              |          \- "ology" (3)
              \- "sych" (6)
                         +- "i" (9)
                         |       +- "atrists" (10)
                         |       \- "cs" (5)
                         \- "otic" (7)
Note that now, the node 20 now contains two items. It is a map (depth -> item).
depth -> item
12    -> "psychiatrist"
13    -> "psychiatrists"
How to query a Token by a keyword
The parser collect all the Token information, and stored them in the TokenTree, the GUI function can query keywords from the database to show function tips or to build a Class Browser tree.
For example, if you want to find all the Tokens named "ab". In the picture above from TokenDatabase(TokenTree). we can search on the Patricia tree containing all the Tokens names, finaly, we find a tree node with a edge "abcd". So, "ab" is in it's Node's items list. Then, we can find a TokenIdxSet in a vector<TokenIdxSet>, this TokenIdxSet has all the index named by "ab", so, we can get the result like: There are many Tokens named "ab".Token "ab" may be a member varialbe name in a class, or a global function name...
ClassA::ab
ClassB::ab
void ab()
....
Flexible Parser structure
The Parser class( in Parser.cpp and Parser.h ) has re-factored to support every project associate with a Parser object (svn revision > 6268 ). Which means: One Parser object per project, so, every project (xxx.cbp) will hold its own Token macro defines and Token trees.
Due to the new introduced conditional preprocessor handling mechanism, the same source file may give different Tokens due to the different macro defines in different project. Also, CC support parsing on the files which does not belong to any project.
- You open a project in CB, then all the files belong to the project( related to the project) will be parsed in CC.
- Now, you open another file( we call it a "separate file" later) which is not belong to the current project nor any other opened project.
- Then the CC will create a "temporary parser" named "NONE“ parser, and add this separate file to the "NONE" parser.
- So, you can still see the class tree when viewing the separate file.
- Once you close this separate file, the "NONE" parser will automatically be removed.
The main idea is: Now, We can let the CC do parse on some separate files and support class browsing in Symbol browser.
Automatic Code Completion
Find the search scope
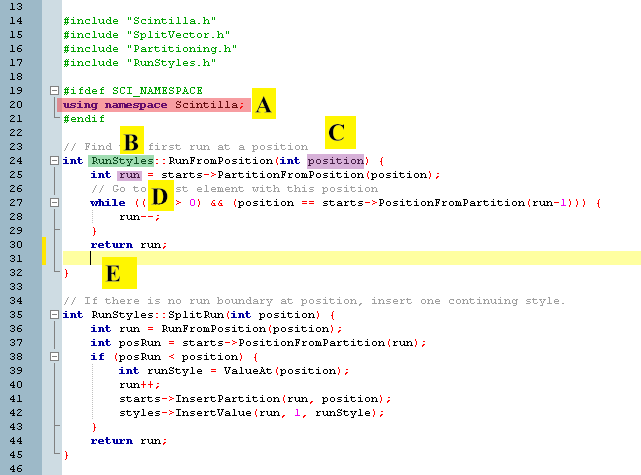
For example, when you are editing, and the caret position was located at "E" as shown in the above image, the first thing doing an automatic code completion is find the search scope.
Here are some steps to get the initial(first) search scope:
- First, you need to correct all the "using namespace XXXX" directives at the beginning the the current source file.(labeled with "A"), this means all the child tokens of "namespace Scintilla" should be searched.
- Secondly, find the function body where the current caret position locates. eg, the above code, the caret is in the "RunStyles::RunFromPosition()" function, so the function parameter variable "position"(labeled with "C" and the local variable "run" (labeled as "D") is also a matching Tokens.
- Thirdly, look at the "B", this means we are in the class named "RunStyles", so, "RunStyles" is also a search scope.
- Finally, don't forget the global namespace scope, because the tokens of this scope are exposed to everywhere of the source.
Break up the current statement
VariableA.m_VariableB.FunctiIf you are entering the above statement, the caret is behind the "Functi". Then the whole line will be break up to several "parsing component".
There are three components: "VariableA" , "m_VariableB" and "Functi". In the next section, I will introduce that the AI matching routing will start from matching the first component with the initial(first) search scope.
Do an AI match
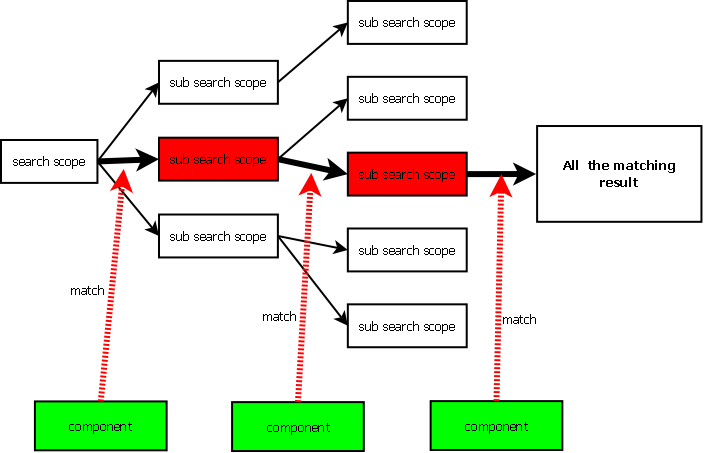
Doing an AI match is just like a walking on a tree, and find the final matching result.See the image below:
Here is the matching algorithm:
Now, suppose we have an initial "search scope", and a "component" array.
The AI match algorithm starts from matching the "sub search scopes" with the first "component", then, the matched "sub search scope"(red rectangle) will be the initial "search scope" again matching with the second "component", this matching routing is running continuously until we matches with the final component. Then we get the whole matching result, that will be show as a auto code completion list.
Code completion debugging support
Debug Log output
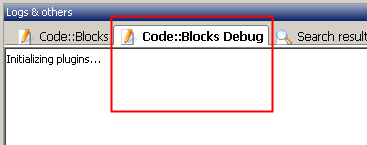
If you want to debug your plug-in, you may need to Logout the debug message to the "Code::Blocks Debug" panel. Here is the sample code:
Manager::Get()->GetLogManager()->DebugLog(_("XXXXX "));

wxString name;
wxString args;
wxString m_Str;
//.....
Manager::Get()->GetLogManager()->DebugLog(F(_T("Add token name='")+name+_T("', args='")+args+_T("', return type='") + m_Str+ _T("'")));
Also, you need start the Code::Blocks with the command line argument. For example in windows.
codeblocks.exe --debug-log
then a Code::blocks debug panel will be shown to display the log.
TRACE macro support
As you can see in the source file like "tokenizer.cpp" or "parserthread.cpp", there is a macro definition in the beginning of the source.
#define CC_CODECOMPLETION_DEBUG_OUTPUT 0

#if CC_CODECOMPLETION_DEBUG_OUTPUT == 1
    #define TRACE(format, args...) \
        Manager::Get()->GetLogManager()->DebugLog(F(format, ##args))
    #define TRACE2(format, args...)
#elif CC_CODECOMPLETION_DEBUG_OUTPUT == 2
    #define TRACE(format, args...)                                              \
        do                                                                      \
        {                                                                       \
            if (g_EnableDebugTrace)                                             \
                Manager::Get()->GetLogManager()->DebugLog(F(format, ##args));   \
        }                                                                       \
        while (false)
    #define TRACE2(format, args...) \
        Manager::Get()->GetLogManager()->DebugLog(F(format, ##args))
#else
    #define TRACE(format, args...)
    #define TRACE2(format, args...)
#endif
This is a quite complex macro definition. So, if CC_CODECOMPLETION_DEBUG_OUTPUT is defined as 0, these debugging macros were disabled. If CC_CODECOMPLETION_DEBUG_OUTPUT is defined as 1, only the TRACE macro will be defined, so you can plot some messages to the Debug log. It is always the parser will parser many files, so the debug messages will be flooding. If we only interest in the debug message when we are parsing a specific source file, the best way was define CC_CODECOMPLETION_DEBUG_OUTPUT as 2. Now, TRACE macro will plot the message only in one source file. The source file name can be specified in token.cpp
const wxString g_DebugTraceFile = _T("myfile.cpp");This way, only the debug message when parsing "myfile.cpp" will be traced.
Code-Completion debug tool dialog
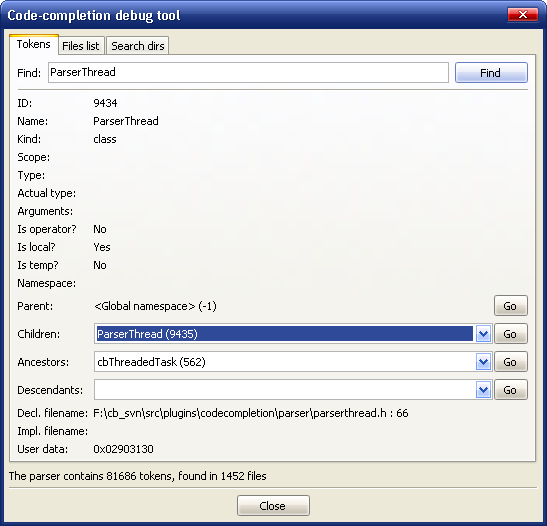
When you press shift and ctrl key and double click on any entry of the navigator tree entry, a debug tool dialog will pop up to give a more detail about the selected token. You can query its information such as its member variables, its Ancestors and so on.
Debug Smart Sense log output
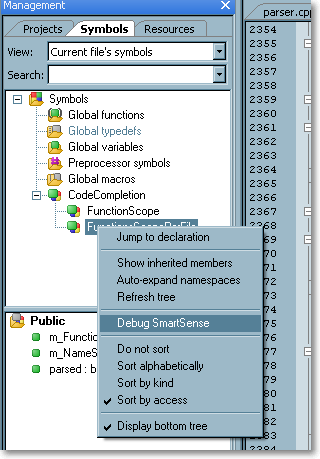
When you hold theshift and ctrl key and right click on any entry of the navigator tree entry, the context menu will have a "Debug SmartSense" menu entry shown. You can click it to enable it. See the image blow. Then, all the debug log information when doing an Auto-completion will be shown in the "Debug Log" panel.
Mutexs and lockers in CC
We need lockers to avoid multiply thread issues of wxString. More detailed can be found: [/index.php/topic,17543.0.html wxString and the locker issue in our CC code], to avoid such issue, we need lockers. There are three main kind of lockers. wxMutex s_ParserMutex; wxMutex s_TokenTreeMutex; wxMutex m_ClassBrowserBuilderThreadMutex; The first one was to protect multiply access to Parser objects, this is a static variable. The second one tries to forbid the multiply access to the TokenTree, the last one is used to build the symbol browser tree(usually show in the left docked panels of the C::B main frame)
The associated Macros are below:
// For tracking, either uncomment:
//#define CC_ENABLE_LOCKER_TRACK
// ...or:
#define CC_ENABLE_LOCKER_ASSERT
// ..or none of the above.

#if defined(CC_ENABLE_LOCKER_TRACK)
    // TRACKING MUTXES
    // [1] Implementations for tracking mutexes:
    #define THREAD_LOCKER_MTX_LOCK(NAME)                                         \
        CCLogger::Get()->DebugLog(F(_T("%s.Lock() : %s(), %s, %d"),              \
                                    wxString(#NAME, wxConvUTF8).wx_str(),        \
                                    wxString(__FUNCTION__, wxConvUTF8).wx_str(), \
                                    wxString(__FILE__, wxConvUTF8).wx_str(),     \
                                    __LINE__))
    #define THREAD_LOCKER_MTX_LOCK_SUCCESS(NAME)                                 \
        CCLogger::Get()->DebugLog(F(_T("%s.Lock().Success() : %s(), %s, %d"),    \
                                    wxString(#NAME, wxConvUTF8).wx_str(),        \
                                    wxString(__FUNCTION__, wxConvUTF8).wx_str(), \
                                    wxString(__FILE__, wxConvUTF8).wx_str(),     \
                                    __LINE__))
    #define THREAD_LOCKER_MTX_UNLOCK(NAME)                                       \
        CCLogger::Get()->DebugLog(F(_T("%s.Unlock() : %s(), %s, %d"),            \
                                    wxString(#NAME, wxConvUTF8).wx_str(),        \
                                    wxString(__FUNCTION__, wxConvUTF8).wx_str(), \
                                    wxString(__FILE__, wxConvUTF8).wx_str(),     \
                                    __LINE__))
    #define THREAD_LOCKER_MTX_UNLOCK_SUCCESS(NAME)                               \
        CCLogger::Get()->DebugLog(F(_T("%s.Unlock().Success() : %s(), %s, %d"),  \
                                    wxString(#NAME, wxConvUTF8).wx_str(),        \
                                    wxString(__FUNCTION__, wxConvUTF8).wx_str(), \
                                    wxString(__FILE__, wxConvUTF8).wx_str(),     \
                                    __LINE__))
    #define THREAD_LOCKER_MTX_FAIL(NAME)                                         \
        CCLogger::Get()->DebugLog(F(_T("%s.Fail() : %s(), %s, %d"),              \
                                    wxString(#NAME, wxConvUTF8).wx_str(),        \
                                    wxString(__FUNCTION__, wxConvUTF8).wx_str(), \
                                    wxString(__FILE__, wxConvUTF8).wx_str(),     \
                                    __LINE__))
    // [2] Cumulative convenient macros for tracking mutexes [USE THESE!]:
    #define CC_LOCKER_TRACK_TT_MTX_LOCK(M)    \
    {                                         \
        THREAD_LOCKER_MTX_LOCK(M);            \
        if (M.Lock()==wxMUTEX_NO_ERROR)       \
          THREAD_LOCKER_MTX_LOCK_SUCCESS(M);  \
        else                                  \
          THREAD_LOCKER_MTX_FAIL(M);          \
    }
    #define CC_LOCKER_TRACK_TT_MTX_UNLOCK(M)    \
    {                                           \
        THREAD_LOCKER_MTX_UNLOCK(M);            \
        if (M.Unlock()==wxMUTEX_NO_ERROR)       \
          THREAD_LOCKER_MTX_UNLOCK_SUCCESS(M);  \
        else                                    \
          THREAD_LOCKER_MTX_FAIL(M);            \
    }
    #define CC_LOCKER_TRACK_CBBT_MTX_LOCK   CC_LOCKER_TRACK_TT_MTX_LOCK
    #define CC_LOCKER_TRACK_CBBT_MTX_UNLOCK CC_LOCKER_TRACK_TT_MTX_UNLOCK
    #define CC_LOCKER_TRACK_P_MTX_LOCK      CC_LOCKER_TRACK_TT_MTX_LOCK
    #define CC_LOCKER_TRACK_P_MTX_UNLOCK    CC_LOCKER_TRACK_TT_MTX_UNLOCK

    // TRACKING CRITICAL SECIONS
    // [2] Implementations for tracking critical sections:
    #define THREAD_LOCKER_CS_ENTER(NAME)                                         \
        CCLogger::Get()->DebugLog(F(_T("%s.Enter() : %s(), %s, %d"),             \
                                    wxString(#NAME, wxConvUTF8).wx_str(),        \
                                    wxString(__FUNCTION__, wxConvUTF8).wx_str(), \
                                    wxString(__FILE__, wxConvUTF8).wx_str(),     \
                                    __LINE__))
    #define THREAD_LOCKER_CS_ENTERED(NAME)                                       \
        CCLogger::Get()->DebugLog(F(_T("%s.Entered() : %s(), %s, %d"),           \
                                    wxString(#NAME, wxConvUTF8).wx_str(),        \
                                    wxString(__FUNCTION__, wxConvUTF8).wx_str(), \
                                    wxString(__FILE__, wxConvUTF8).wx_str(),     \
                                    __LINE__))
    #define THREAD_LOCKER_CS_LEAVE(NAME)                                         \
        CCLogger::Get()->DebugLog(F(_T("%s.Leave() : %s(), %s, %d"),             \
                                    wxString(#NAME, wxConvUTF8).wx_str(),        \
                                    wxString(__FUNCTION__, wxConvUTF8).wx_str(), \
                                    wxString(__FILE__, wxConvUTF8).wx_str(),     \
                                    __LINE__))
    // [2] Cumulative convenient macros for tracking critical sections [USE THESE!]:
    #define CC_LOCKER_TRACK_CS_ENTER(CS) \
    {                                    \
         THREAD_LOCKER_CS_ENTER(CS);     \
         CS.Enter();                     \
         THREAD_LOCKER_CS_ENTERED(CS);   \
    }
    #define CC_LOCKER_TRACK_CS_LEAVE(CS) \
    {                                    \
          THREAD_LOCKER_CS_LEAVE(CS);    \
          CS.Leave();                    \
    }
#elif defined CC_ENABLE_LOCKER_ASSERT
    #define CC_LOCKER_TRACK_CS_ENTER(CS)     CS.Enter();
    #define CC_LOCKER_TRACK_CS_LEAVE(CS)     CS.Leave();

    #define CC_LOCKER_TRACK_TT_MTX_LOCK(M)   cbAssert(M.Lock()==wxMUTEX_NO_ERROR);
    #define CC_LOCKER_TRACK_TT_MTX_UNLOCK(M) cbAssert(M.Unlock()==wxMUTEX_NO_ERROR);
    #define CC_LOCKER_TRACK_CBBT_MTX_LOCK    CC_LOCKER_TRACK_TT_MTX_LOCK
    #define CC_LOCKER_TRACK_CBBT_MTX_UNLOCK  CC_LOCKER_TRACK_TT_MTX_UNLOCK
    #define CC_LOCKER_TRACK_P_MTX_LOCK       CC_LOCKER_TRACK_TT_MTX_LOCK
    #define CC_LOCKER_TRACK_P_MTX_UNLOCK     CC_LOCKER_TRACK_TT_MTX_UNLOCK
#else
    #define CC_LOCKER_TRACK_CS_ENTER(CS)     CS.Enter();
    #define CC_LOCKER_TRACK_CS_LEAVE(CS)     CS.Leave();

    #define CC_LOCKER_TRACK_TT_MTX_LOCK(M)   M.Lock();
    #define CC_LOCKER_TRACK_TT_MTX_UNLOCK(M) M.Unlock();
    #define CC_LOCKER_TRACK_CBBT_MTX_LOCK    CC_LOCKER_TRACK_TT_MTX_LOCK
    #define CC_LOCKER_TRACK_CBBT_MTX_UNLOCK  CC_LOCKER_TRACK_TT_MTX_UNLOCK
    #define CC_LOCKER_TRACK_P_MTX_LOCK       CC_LOCKER_TRACK_TT_MTX_LOCK
    #define CC_LOCKER_TRACK_P_MTX_UNLOCK     CC_LOCKER_TRACK_TT_MTX_UNLOCK
#endif
Each mutex need a Lock and Unlock macro, like for mutex for Parser, we need CC_LOCKER_TRACK_P_MTX_LOCK and CC_LOCKER_TRACK_P_MTX_UNLOCK.
Usefull Links
- A discussion on search tree in the forum [/index.php/topic,1696.0.html] and [/index.php/topic,1581.0.html].
- Another opensource IDE VCF builderorvcfbuilder on sf, By the way , VCF use a CodeStore based on antlr parser to deal with parsing, the whole source code can be check out from
svn co https://vcfbuilder.svn.sourceforge.net/svnroot/vcfbuilder vcfbuilder
- online bookData Structures and Algorithms II Course and pdf lectures
- A forum discussion on why a standard perprocessor and parser works slowly. [/index.php/topic,2494.msg19801.html#msg19801 parsing iostream header takes 5 seconds]
- CodeLite is another open source IDE using wxWidgets, use Ctags as a indexing service, and do context expression syntactic analysis generated from Lex and Yacc tools.See the explanation in forum message by it's author eranif [/index.php/topic,10087.msg70875.html#msg70875 How does Codelite's CC work with CTags and Yacc&Lex]
- Hopefully, we can use the patricia tree from the standard library, see here:trie
- a blog from KDE4's developer, it explain the code completion in KDE4, see here:zwabel' blog
- QT creator source code from QT-creator source
- Kdevelop source code and it's parser
- [/index.php/topic,11724.0.html Just a reminder Codelite IDE now have improved it's parser]
- [/index.php/topic,1581.msg11701.html#msg11701 A Mini C++ interpreter] from the book "The Art of C++ by Herbert Schildt", source code can be download here
- Lecture 7: Parsing (intro) (pdf) and Lecture 8: Recursive Descent Parsing (pdf) from Data Structures and Algorithms II
- There are some online "Compiler design" books listed in Free Online Compiler Design and Construction Books :: FreeTechBooks.com, and the best one I think is : Basics of Compiler Design, and you can get a basic understanding.
- LLVM's online tutorials on how to write a simple compiler LLVM Tutorial
- Roberto Raggi's new parsercplusplus 5 My experimental C++ front end, note Roberto Raggi is the author of the parser for both Qtcreator and Kdeveloper IDE.
- KDevelop are discussing clang now, see Kate/KDevelop Sprint 2014: Let There Be Clang | Milian Wolff
