Difference between revisions of "Creating a Plug-in which modifies CB's Menus"
m (edited categories) |
m (removed extra category) |
||
| Line 1: | Line 1: | ||
| − | |||
[[Category:Plugin development]] | [[Category:Plugin development]] | ||
== Environment == | == Environment == | ||
Revision as of 19:30, 11 November 2006
Environment
NOTE : Also an update for wx 2.6.1 and creating a menu in the menu toolbar are in the pipeline.
The following has been carried out with/on :
   * Windows XP SP2
   * Code::Blocks RC1-1
   * wxWindows 2.4.2
The entire project is available in this zip file
Create the plug-in project
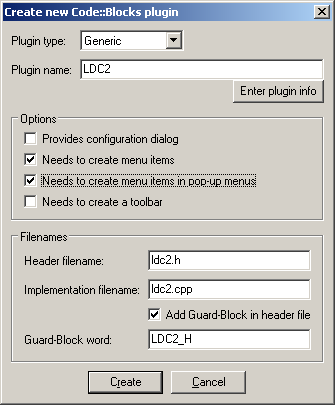
First thing we need to do is create a plug-in project. For more info on how to setup everything see this page on the wiki. In our tutorial we create a plug-in of type General. I gave it the name LDC2, and selected the settings :
   * Needs to create menu items
   * Needs to create menu items in pop-up menus
Afterwards the code get's generated (LDC2.h/cpp). Try to build the project. I encountered 1 problem : I had to change the line in the header file :
void BuildToolBar(wxToolBar* toolBar){ return; }
to :
bool BuildToolBar(wxToolBar* toolBar){ return false; }
After doing this it compiled fine for me.
Logging during the plug-in
During the implementation I am going to write some feedback stuff on the screen. I chose to use the log facilities that allow you to write to the Code::Blocks tab in the output pane (which also contains a "Search Results", "Compiler", ... tabs). To do this we need to do the following things :
   * Get hold of the Manager interface which we can use to retrieve other interfaces
   * Get hold of the MessageManager interface, which we will be using for the logging
Both can be done in 1 statement : Manager::Get()->GetMessageManager() . To be able to call those functions we need to add the declarations of those functions, therefor we add the following include statements in the implemenation file :
- include <manager.h>
- include <messagemanager.h>
The method I use for logging is Log(), which has a similar syntax as nasty old printf.
Menu adjusting
If your plug-in wants to adjust the menu, the correct place to do it is in the BuildMenu method. When Code::Blocks is starting up it will call your plug-in by this method, allowing you to change the menu. Therefor it provides as an argument it's menuBar. The normal menuBar consists out of 11 menus, starting with "File", "Edit", "View" and so on. These menus are ordered, or otherwise stated they have a position. Where the first position is position "0". So "File" is at position 0, "Edit " at position 1, ... So let's get our feet wet and start by adjusting the "Edit" menu.
The first thing we need to do is get hold of the "Edit" menu. The class wxMenuBar, the type of our menuBar parameter, provides the method "FindMenu" to search for certain menus. The menu to search for is the argument of the method, and is specified by it's textual id, and returns the position of the menu. So in our case we get :
int pos = menuBar->FindItem(_("Edit"));
If this menu would not be found the return value is wxNOT_FOUND. In the example code, we write out the position of the menu to the Log. Check that this should be 1. Now that we have the position of the menu, we can get hold of it's interface (or pointer to the menu object), this is done by calling the GetMenu() method of he wxMenuBar class. The argument is the position of the menu, from which we want the interface.
wxMenu* EditMenu = menuBar->GetMenu(pos);
Now that we have hold of the actual menu we want to adjust, we can start by adding new entries to the menu. We have several locations where we can add our own entries :
   * at the start/beginning/top => Prepend
   * at the end/bottom => Append
   * in the middle => Insert
It is good practice when you add new entries, that you seperate them visually from the already existing entries, or to group them logically. This can be done by use of a separator, this is a vertical line that goes from left to right in the menu. The menu class wxMenu provides for the 3 cases above, 3 different methods :
   * AppendSeparator()
   * PrependSeparator()
   * InsertSeperator(int pos), where pos is the position of the entry at which it should be inserted.
For our entries we have the following methods at our disposal according to the 3 situations described above :
   * Append()
   * Prepend()
   * Insert()
There is however one more thing we need to take care of, before we can proceed for adding our own entries. Every menu entry needs to have a unique id in the program. Since we are a plug-in, and those can be added dynamically, we have no idea of which id's are already taken and which are available. Luckily the underlying wxWindows mechanism takes care of that for us. We can ask the wxWindows mechanism to generate a new id for us, and then we use that one. This is done by calling the function "wxNewId". So for our first entry we do like this :
int idMenuEntry1 = wxNewId();
This id can be used to identiy our own menu entries.
Now let's add our first extra entry in the menu :
EditMenu->Append(idMenuEntry1, _("Menu Entry 1\tCtrl-Shift-1"));
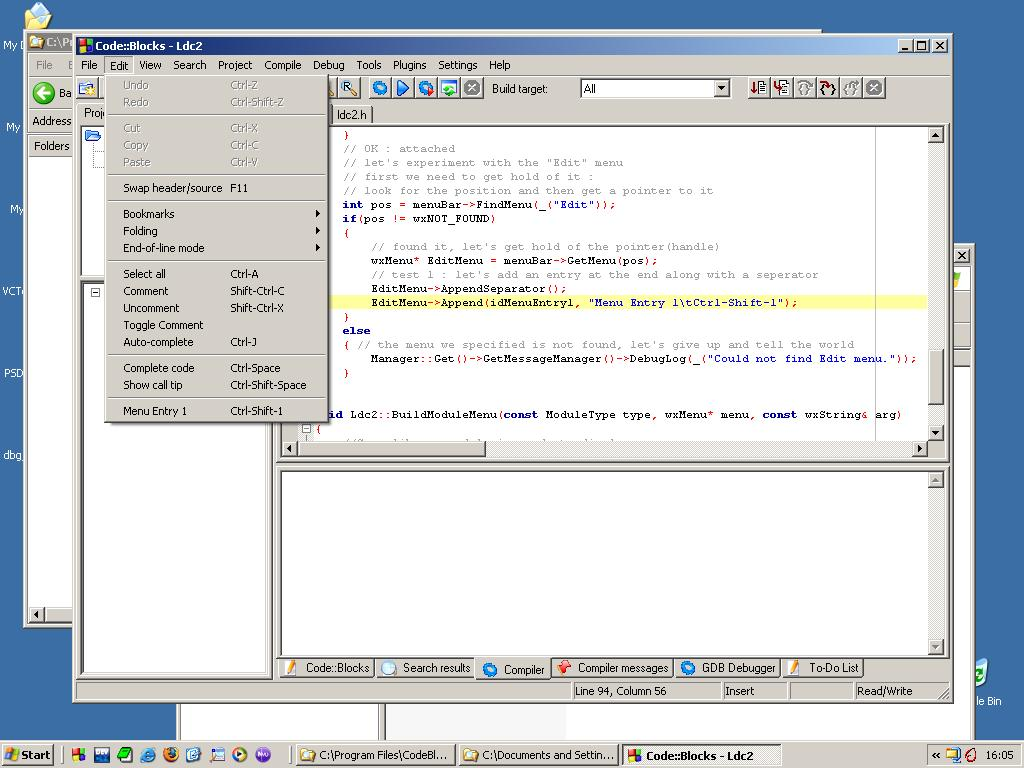
So the id is specified as the first parameter to the Append method, and as a second argument we specify the Caption of the menu entry "Menu Entry 1", and in the mean time we specify the keyboard accelerator/shortcut. Both are specified in a string seperated by a tab character (\t). The picture below show the result of adding our first extra menu entry together with a separator.
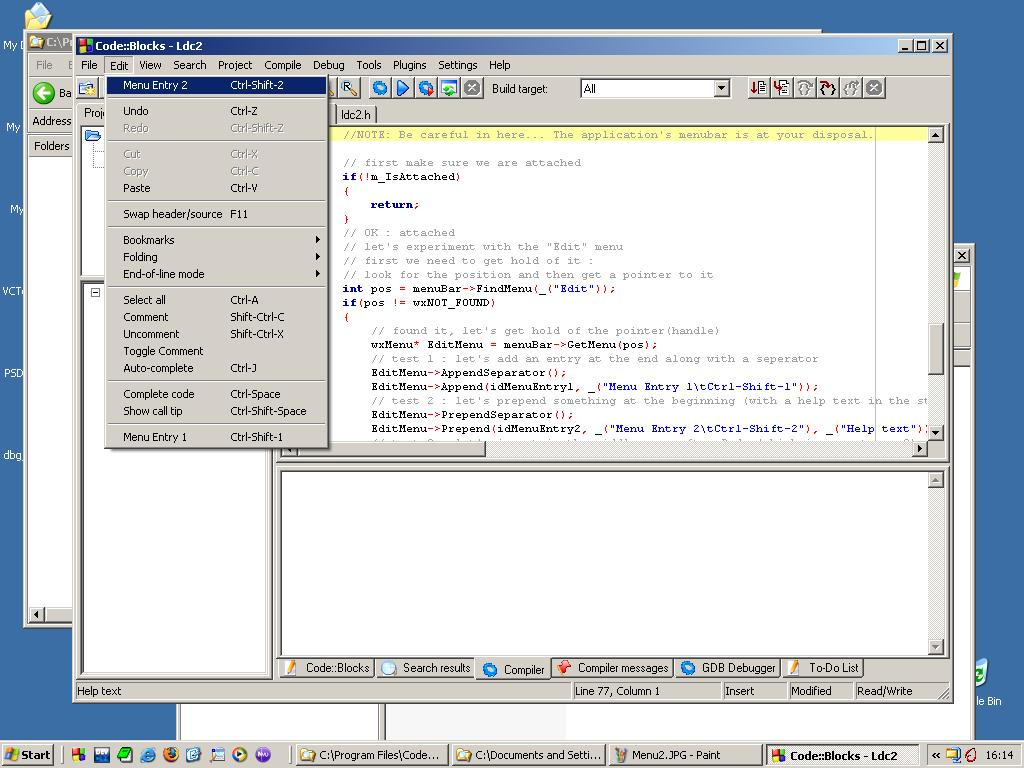
Next in our code example we add a menu entry at the top of the menu, and we use a third argument (works with all 3 methods to add entries) where we specify a help text to be displayed in the status bar of Code::Blocks.
EditMenu->Prepend(idMenuEntry2, _("Menu Entry 2\tCtrl-Shift-2"), _("Help text"));
The result looks like this :
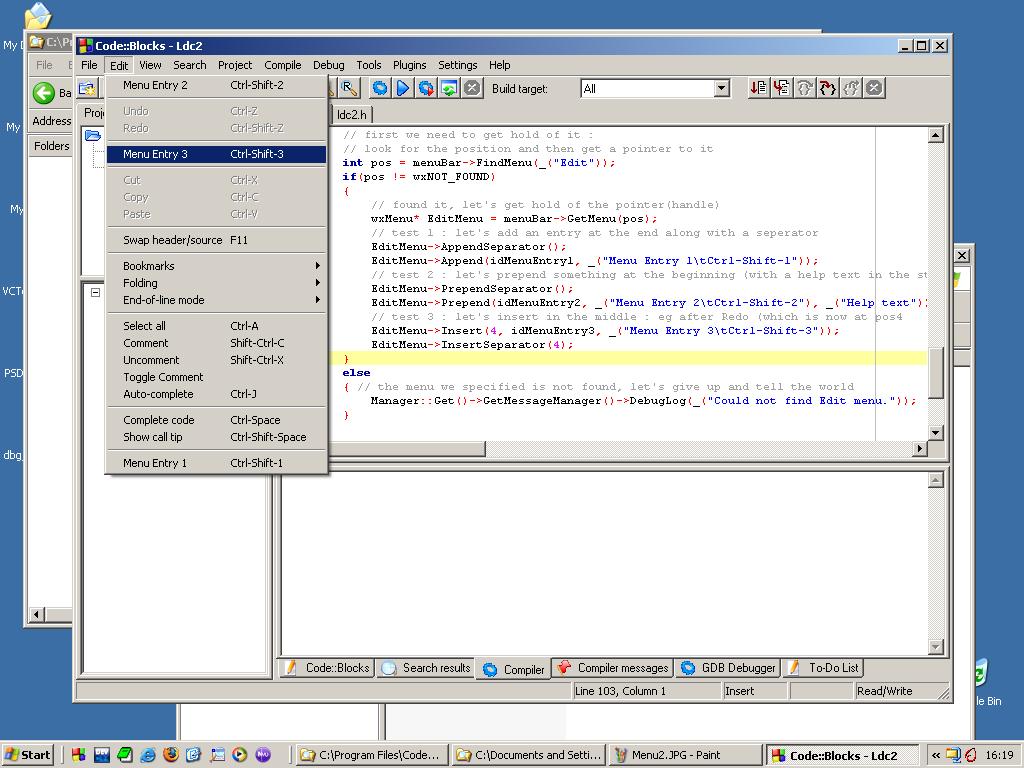
Next we add a third entry somewhere in between, we add it after the Redo entry and the following separator. That Redo is the 4th entry, so counting from zero : pos 3. Menu entry 2 is at O, Seperator at 1, Undo at 2, Redo at 3. So our new entry is at position 4..
EditMenu->Insert(4, idMenuEntry3, _("Menu Entry 3\tCtrl-Shift-3"));
Wich gives the following result :
So by locating our menu, getting it's interface, and using some methods we were able to add new menu entries.
Let's take our manipulation of the menu 1 step further. Let's create a submenu, which has its own entries. Since a submenu is nothing more then a menu, we first need to create a new menu object; this new object has to live as long as the plug-in itself, so it can not be a local variable, it needs to be stored in the class itself. Therefor we added the member m_SubMenu1, initialized to NULL, and released during the destructor. We will allocate it now :
m_SubMenu1 = new wxMenu();
And we append this new menu to our EditMenu :
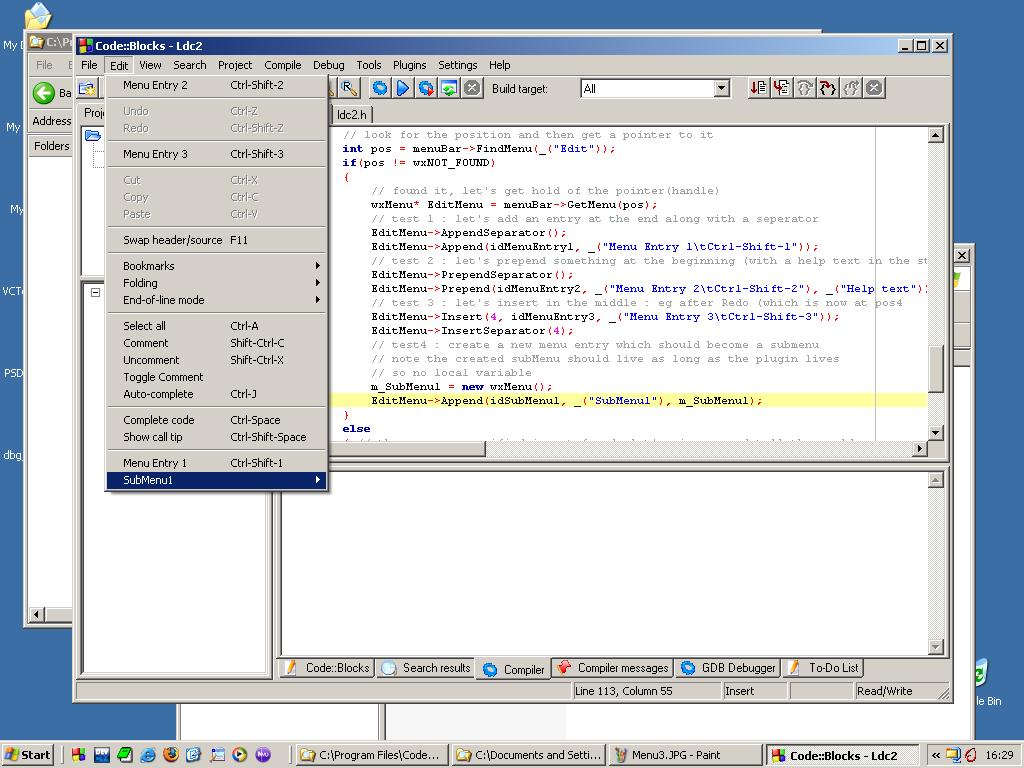
EditMenu->Append(idSubMenu1, _("SubMenu1"), m_SubMenu1);
The result looks like :
The next task is adding an entry into this new menu. We already have hold of the menu interface (we just created it), nevertheless let's see what we need to do in the case we would not have it's interface yet (for example if we want to add entries to an existing submenu). As submenu together with the other entries in the menu are called menuItem's. So within the "Edit" menu we need to search for the item "SubMenu1" and we will get in return, in the case it is found, it's position.
int idSub = EditMenu->FindItem(_("SubMenu1"));
Once we have the position we can retrieve the interface of the item.
wxMenuItem* SubMenu1Item = EditMenu->FindItem(idSub, NULL);
Just fill in NULL as the second argument (I still need to find out what's its purpose). From the item we can retrieve the actual submenu as follows :
wxMenu* SubMenu1 = SubMenu1Item->GetSubMenu();
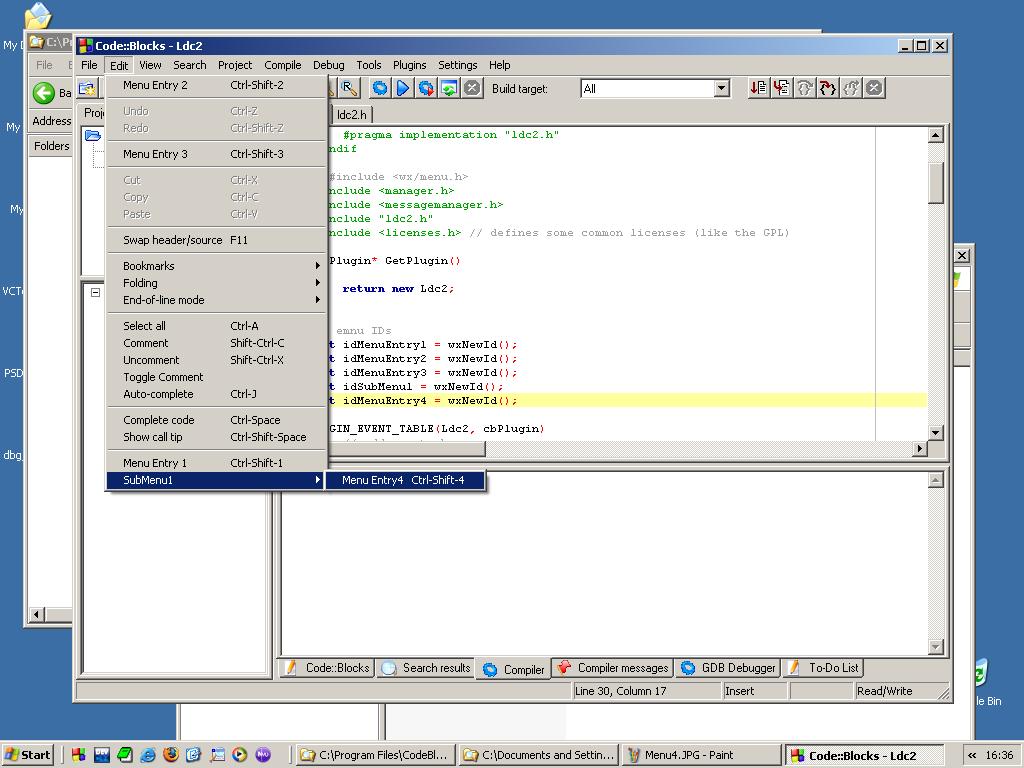
And now we add like before a new entry. The result looks like :
Another menu we can adjust is the pop-up menu you get by right-clicking in the editor pane of an open source file, sometimes also called the context menu. As with the regular menu, the application will call a method of our plug-in to allow us to adjust the context menu. The method is "BuildModuleMenu", as arguments we get the type of the Module generating the context menu, and the interface of that menu. So things are very easy here, we get the menu interface directly. We only need to make sure that :
   * we are attached
   * the menu does exist
   * the module type is that of the editor manager
In code the test on the type looks like :
if(type == mtEditorManager)
And next we can add an entry like :
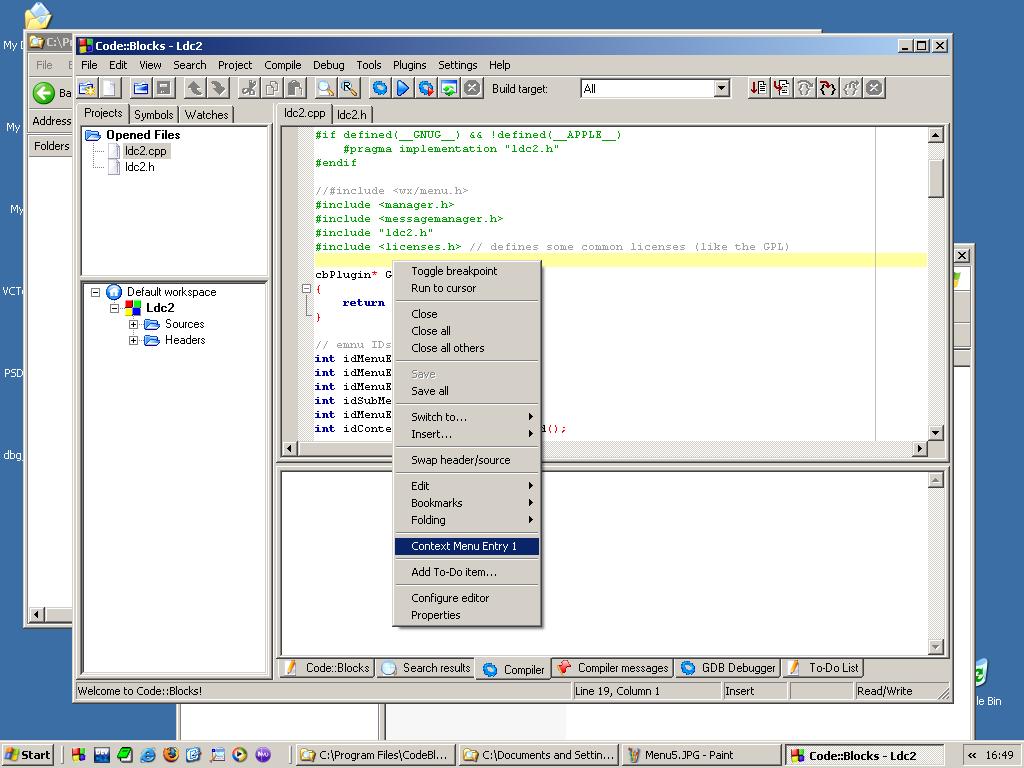
menu->Append(idContextMenuEntry1, _("Context Menu Entry 1"));
The result looks like :
So this was a piece of cake.
Now that we have added all those new menu entries, it would be nice that they actually do something. If you select them at this moment nothing happens. Nevertheless they already did something behind the scenes. When you click on a menu entry they generate a wxCommand event. It is our duty to listen to those events and provide a handler for them. A handler can be seen as a method that does the stuff we want to happen when the menu entry is selected. Those handlers should have the following signature : void ClassName::MethodName(wxCommandEvent& event); So for our 4 menu entries we have now, we add the following declarations in the header, in the private section :
       void OnMenuEntry1(wxCommandEvent& event);
       void OnMenuEntry2(wxCommandEvent& event);
       void OnMenuEntry3(wxCommandEvent& event);
       void OnMenuEntry4(wxCommandEvent& event);
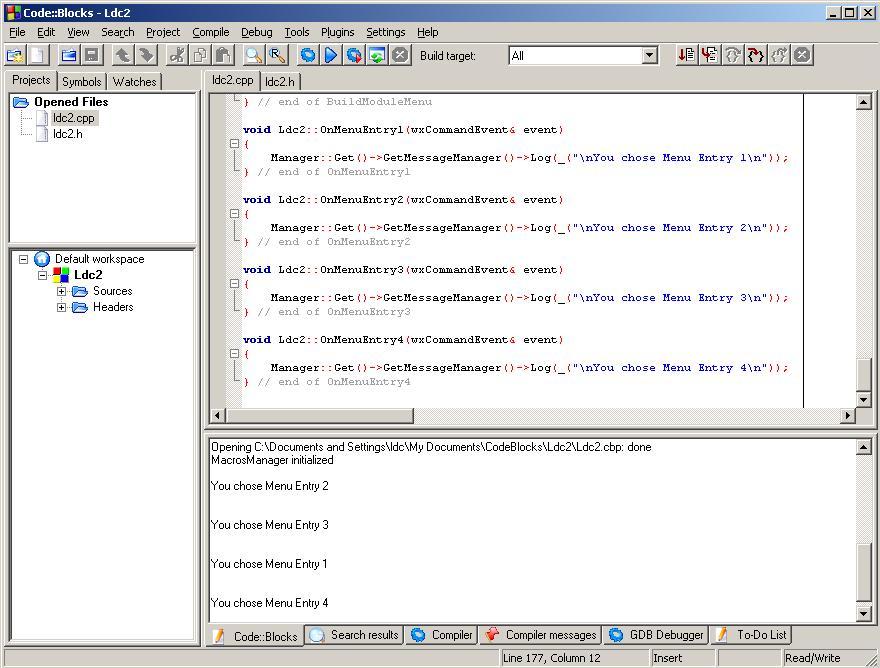
And we provide some dummy implementation, they just write to the Log, telling us they were selected, now how about that for usefull functionality.
All that's left to do is provide the missing link : connect the event to it's handler. What we already know is that each menu entry has an unique id. The way wxWindows work is that we have to link that id with the event handler. Those links are specified in the implementation file in the block :
       BEGIN_EVENT_TABLE(Ldc2, cbPlugin)
           // add events here...
       END_EVENT_TABLE()
This was placed in the generated code by the Plug-In wizard. Also in the class declaration we find such a directive : DECLARE_EVENT_TABLE() The BEGIN_EVENT_TABLE directive tells that our class Ldc2 listens to the same events as the cbPlugIn (our class was derived from cbPlugIn). Personal note : I hope this statement is correct. Next we create mappings as follows :
EVT_MENU(idMenuEntry1, Ldc2::OnMenuEntry1)
By means of the directive EVT_MENU we map our id idMenuEntry1 to the handler Ldc2::OnMenuEntry1 Where in our example the end result is :
       BEGIN_EVENT_TABLE(Ldc2, cbPlugin)
           // add events here...
           EVT_MENU(idMenuEntry1, Ldc2::OnMenuEntry1)
           EVT_MENU(idMenuEntry2, Ldc2::OnMenuEntry2)
           EVT_MENU(idMenuEntry3, Ldc2::OnMenuEntry3)
           EVT_MENU(idMenuEntry4, Ldc2::OnMenuEntry4)
       END_EVENT_TABLE()
Note : no semicolons at the end. If you have compiled our example code, put the dll in the subdir .\share\CodeBlocks\plugins of Code::Blocks installation directory, you can try out the menus and see how it actually does work. ;-) In the project zip file, the dll is also included. The following screenshot shows the Log when we choose some of our menu entries.
That's all for now, more tutorials will follow. Enjoy. I would like to thank Mandrav and the rest of the Code::Blocks team for this great IDE, and also Thomas who gave me my first pointers on where to find some information.
