Difference between revisions of "Using wxGrid"
m |
|||
| Line 40: | Line 40: | ||
</pre> | </pre> | ||
| − | The choice of pt as the name of created instance is arbitrary; the letters are just old Barnum's initials. Everything else has to be just as it is. Because we have used “ShowModal”, the program does not get to the “delete” line until the user has closed the dialog containing the grid. But because we then promptly “delete” the instance of Barnum – that is to say, we release the space in memory which the “new” command grabbed for it – we should not experience any memory leaks. | + | The choice of pt as the name of the created instance is arbitrary; the letters are just old Barnum's initials. Everything else has to be just as it is. Because we have used “ShowModal”, the program does not get to the “delete” line until the user has closed the dialog containing the grid. But because we then promptly “delete” the instance of Barnum – that is to say, we release the space in memory which the “new” command grabbed for it – we should not experience any memory leaks. |
There is one more thing that must be done before the program will compile. wxSmith created a header file to go with Barnum but it did not “include” it in the main program. We must do so. Run the scrollbar up to the top of DiaGridMain.cpp. The first non-comment lines you see are these: | There is one more thing that must be done before the program will compile. wxSmith created a header file to go with Barnum but it did not “include” it in the main program. We must do so. Run the scrollbar up to the top of DiaGridMain.cpp. The first non-comment lines you see are these: | ||
| Line 248: | Line 248: | ||
[[File : xpy.png | |center]] | [[File : xpy.png | |center]] | ||
| − | As for the square of integers in the upper left corner of the grid, it is “magic”; all rows, columns and diagonals have the same sum. Anyone venturing into wxGrid land is going to need all the magic he can get. But studying Barnum.cpp or other wxSmith code should be helpful. | + | As for the square of integers in the upper left corner of the grid, it is “magic”; all rows, columns and diagonals have the same sum. Anyone venturing into wxGrid land is going to need all the magic he can get. But studying Barnum.cpp or other wxSmith code should be helpful. If it is hard to imagine how Smart and Hock could have thought that their very incomplete example was sufficient it is even more mind-boggling that BYO, the creator of wxSmith, was able to figure out what had to be done and make it all so easily available. |
Revision as of 22:36, 5 February 2017
A grid can be a useful way to display data, especially matrices of numbers. If the matrices are large, the full grid will be too big for the screen, so we will want to display it in modest proportions but allow the user to resize it or scroll about in it with the mouse. Like so many things related to computing, creating such a grid with wxSmith is easy once you know how, but figuring out how can consume many hours. What follows is the distilled result of such a trial-and-error process. At the end, we will have a scrollable grid with names on the columns and rows and values numeric values in some elements of a 40x40 matrix.
Probably the most valuable use of the code that wxSmith writes for us is as an example of how to use wxGrid. When Smart and Hock get around to describing it on page 346, they seem to have run out of energy for making up clear, complete examples. wxSmith can come to their rescue with nice examples. The code written by wxSmith itself, however, is not likely to go directly into your final program. For example, you may well want the size of the grid to be determined by variables in your program. The code wxSmith writes has the size of the grid given by two constants, the number of rows and the number of columns, but you can easily see from that code how to make the grid's size depend on variables in your code.
So let's get started. Create a new wxWidgets application. Call it DiaGrid and make it frame-based. We don't want the grid showing all the time, only when we call it up, so we need to add a Frame or Dialog as we did back in Tutorial 4. For ease in avoiding memory leaks, we will use a Dialog, hence the name DiaGrid for the program.
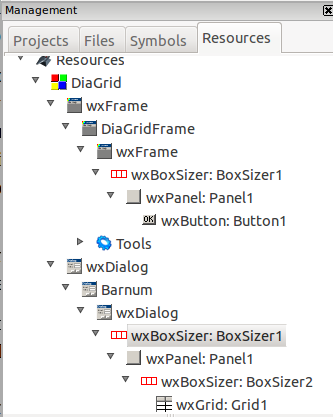
Click on the wxSmith tab of the CodeBlocks main menu and click “Add wxDialog”. Call it Barnum. (Why Barnum? I first used names with “grid” and “dialog” but wxSmith also uses “dialog” a lot and “grid” has a specific meaning. The names became very confusing; something unique was needed. P.T. Barnum was a master American circus showman; since we are trying to show a grid that shows data, “Barnum” seemed as good choice as any.) Drop a box sizer into the frame. Into the sizer put a panel and check the panel's Expand property. Onto the panel drop another box sizer. Into it put a wxGrid from the “Advanced” tab of wxSmith. The lower part of the Management pane should now look as shown on the right.
Click on the wxGrid and set its number of columns to 40 and number of rows to 40; uncheck the Default size box and set the width to 400 and height to 300. (These numbers are in pixels. It is very important to unckeck that Default size box.) Click on the + inside a □ next to the word Style to drop down a list of Style features; check the box for wxFullRepaintOnResize. Finally, check the Expand box. At this point you should see encouraging signs on the right; a grid has appeared.
If you click the “Show preview” button over on the right (just under the big red X) a grid appears and you can scroll around in it. It is pretty small, but if you try to stretch it with the mouse, you will find that it won't stretch. We have forgotten something. Click on that wxDialog just under Barnum in the Resources pane. Click on the + in the square next to “Style” in is properties box. Scroll down until you get to wxRESIZE-BORDER and check it. Do the same with the wxDialog above Barnum. Now the grid should stretch. (This was discovered by a lot of trial and error.)
Note that we did not put scroll bars on any of the components we used. The wxGrid component automatically carries its own scroll bars and any others just make for confusion.
Now that we have a grid in our frame, we need a way to show it from the running program. The simplest way is to have a button which, when clicked, will show the frame and with it the grid. So in the editor area of Code::Blocks click on the DiaGridframe.wxs tab. Drop onto it a box sizer and into the box sizer a panel, and onto the panel a button. Change the button's label to “ShowGrid” and double click the button.
You are thrown into DiaGridMain.cpp. Down at the bottom of the file you will find that an empty frame has been created for you to specify what to do when that button is clicked. The frame looks like this:
void DiaGridFrame::OnButton1Click(wxCommandEvent& event)
{
}
And you fill it in to look like this:
void DiaGridFrame::OnButton1Click(wxCommandEvent& event)
{
   Barnum *pt = new Barnum(this);
   pt->ShowModal();
   delete pt;
}
The choice of pt as the name of the created instance is arbitrary; the letters are just old Barnum's initials. Everything else has to be just as it is. Because we have used “ShowModal”, the program does not get to the “delete” line until the user has closed the dialog containing the grid. But because we then promptly “delete” the instance of Barnum – that is to say, we release the space in memory which the “new” command grabbed for it – we should not experience any memory leaks.
There is one more thing that must be done before the program will compile. wxSmith created a header file to go with Barnum but it did not “include” it in the main program. We must do so. Run the scrollbar up to the top of DiaGridMain.cpp. The first non-comment lines you see are these:
	#include "wx_pch.h"
	#include "MatGridMain.h"
	#include <wx/msgdlg.h>
Just below them add:
#include "Barnum.h"
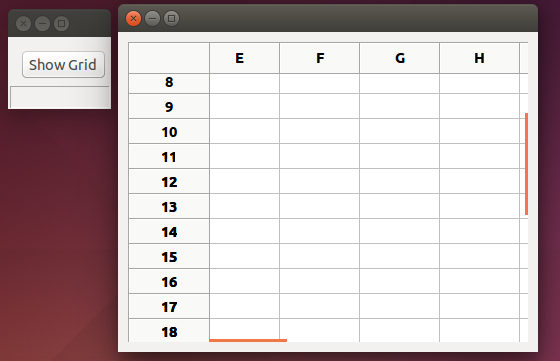
Now click the Code::Blocks “Build and run” button. The code should compile, link and begin executing. But only a small frame with a button labeled “Show Grid” appears. Click the button, and the grid should appear. You should be able to drag the edges or corners of the grid to enlarge it, and the scroll bars should work. Here is a picture of it working. The user has scrolled down and over to the right before this screenshot was taken.
Of course, there is nothing in the grid. That comes next. Let's make wxSmith get us started.
First, let's label some of the rows and columns of the grid. In the Resources tab of the Management pane, click on Grid1. Scroll down in the properties window until you come to “Column Labels” and then click on the little square at the right end of the line. A window drops down and you enter labels for the columns, one per line. I just used the names of the first few letters of the Greek alphabet; three or four lines is enough for our present purposes. Then click on the next line in the properties box, “Row Labels”, again click on the little square at the right end of the line and enter row labels, one per line. I just used another string of letters in the Greek alphabet. Four or five is enough for now.
Now we can put some values in the cells. The next row down in the properties box is “Cell Data”. Again click the little square at the right end of the line. Enter 2, 7, and 6 on successive lines. These will go into the first row. Since we have set the number of columns to 40, we would have to add 37 more lines to get to the second row. We will get there by a different route.
Let's now have a look at the code wxSmith has written for us. To avoid repetition, however, I will show the code after some additions by hand, but with clear markings distinguishing what wxSmith wrote from what was later added.
Barnum::Barnum(wxWindow* parent,wxWindowID id,const wxPoint& pos,const wxSize& size)
{
  //(*Initialize(Barnum)
  wxBoxSizer* BoxSizer2;
  wxBoxSizer* BoxSizer1;
  Create(parent, id, wxEmptyString, wxDefaultPosition, wxDefaultSize, wxDEFAULT_DIALOG_STYLE |wxRESIZE_BORDER,  _T("id"));
  SetClientSize(wxDefaultSize);
  Move(wxDefaultPosition);
  BoxSizer1 = new wxBoxSizer(wxHORIZONTAL);
  Panel1 = new wxPanel(this, ID_PANEL1, wxDefaultPosition, wxDefaultSize, wxTAB_TRAVERSAL, _T("ID_PANEL1"));
  BoxSizer2 = new wxBoxSizer(wxHORIZONTAL);
  Grid1 = new wxGrid(Panel1, ID_GRID1, wxDefaultPosition, wxSize(400,300), wxFULL_REPAINT_ON_RESIZE, _T(//*)

//***End of Part 1. Everything above this line was written by wxSmith *******

//                                  Part 2.

// Now comes the hand-coded section (with a few lines borrowed from wxSmith)

    int nrows, ncols;
    nrows =20; ncols = 30;

    Grid1->CreateGrid(nrows,ncols); // wxSmith had Grid1->CreateGrid(40.40);
    Grid1->EnableEditing(true);     // from wxSmith
    Grid1->EnableGridLines(true);   // from wxSmith
// Label some columns
    Grid1->SetColLabelValue(0, _("alpha")); //from wxSmith
    Grid1->SetColLabelValue(1, _("beta"));  //from wxSmith
    Grid1->SetColLabelValue(2, _("gamma")); //from wxSmith
    Grid1->SetColLabelValue(3, _("delta "));
    Grid1->SetColLabelValue(4, _("epsilon"));

// Label some rows
   Grid1->SetRowLabelValue(0, _("mu")); // from wxSmith
   Grid1->SetRowLabelValue(1, _("nu")); // from wxSmith
   Grid1->SetRowLabelValue(2, _("xi")); // from wxSmith
   Grid1->SetRowLabelValue(3, _("omicron"));
   Grid1->SetRowLabelValue(4, _("pi"));

// Column or row labels can be set from C-strings whose
// values are determined at runtime by first converting
// the C-string to a wxString, as illustrated here:

    char colone[10];        //colone is the variable C-string.
    strcpy(colone,"alpha2");// Give it some content at run time.
    wxString ColumnName;    // Define a wxString which may be used repeatedly.
// Convert contents of the C-string to a wxString:
    ColumnName = wxString::FromUTF8(colone);
    Grid1->SetColLabelValue(0,ColumnName); // Set the column label.

// Set some cell values
	Grid1->SetCellValue(0, 0, _("2")); //from wxSmith
	Grid1->SetCellValue(0, 1, _("7")); //from wxSmith
	Grid1->SetCellValue(0, 2, _("6")); //from wxSmith

	Grid1->SetCellValue(1, 0, _("9"));
	Grid1->SetCellValue(1, 1, _("5"));
	Grid1->SetCellValue(1, 2, _("1"));
	Grid1->SetCellValue(2, 0, _("4"));
	Grid1->SetCellValue(2, 1, _("3"));
	Grid1->SetCellValue(2, 2, _("8"));

// Illustrate what SetColFormatFloat() does. From Smart & Hock, page 348 corrected.
	Grid1->SetColFormatFloat(5,6,2); // Format numeric strings in column 5.
	Grid1->SetCellValue(0,5,_("3.14159")); // Put a number with 5 decimals there.
    // Put the same string in Column 4 for comparison.
    Grid1->SetCellValue(0,4,_("3.14159"));

// Here is how to show floats defined at run time in the wxGrid:
    float e = 2.71828;
    wxString cart;
    cart = wxString::Format(_T("%f"), e);
    Grid1->SetCellValue(1,4,cart);
    Grid1->SetCellValue(1,5,cart);

// Display a matrix of floats defined at run time.
    short i,j;
    float xx;
    for (i = 10; i <=12; i++){
        for (j = 10; j <= 12; j++){
            xx = i*j;
            xx = xx/2.;
            cart = wxString::Format(_T("%8.2f"),xx);
            Grid1->SetCellValue(i,j,cart);
            }
        }
//
//                    *** Part 3 ***
// All that follows was written by wxSmith.
	Grid1->SetDefaultCellFont( Grid1->GetFont() );
	Grid1->SetDefaultCellTextColour( Grid1->GetForegroundColour() );
	BoxSizer2->Add(Grid1, 1, wxALL|wxEXPAND|wxALIGN_CENTER_HORIZONTAL| wxALIGN_CENTER_VERTICAL, 5);
	Panel1->SetSizer(BoxSizer2);
	BoxSizer2->Fit(Panel1);
	BoxSizer2->SetSizeHints(Panel1);
	BoxSizer1->Add(Panel1, 1, wxALL|wxEXPAND|wxALIGN_CENTER_HORIZONTAL|wxALIGN_CENTER_VERTICAL, 5);
	SetSizer(BoxSizer1);
	BoxSizer1->Fit(this);
	BoxSizer1->SetSizeHints(this);
)
wxSmith has separated its code into three parts – without, however, marking the divisions. I have added the division markers in the above listing. The first part has some preliminaries, the second part creates the grid and puts various values into it, and the third part attends to other matters whose precise function is elusive but presumably very necessary for the program to function properly.
It is Part 2 that the programmer is likely to want to change. The first line of Part2 as written by wxSmith was:
Grid1->CreateGrid(40,40);
The size of the grid may well not be known at compile time but depend on the matrix to be displayed. Somehow that variable size will be communicated to Barnum, perhaps by parameters in the call, perhaps by global variables, perhaps by a read from a file. To keep matters simple, I have represented that process by just defining nrows and ncols as ints in the code, but as far as the CreateGrid() function knows they came from somewhere else. So our Part2 begins:
    int nrows, ncols;
    nrows =20; ncols = 30;
    Grid1->CreateGrid(nrows,ncols);
Just above these lines we need to mark the end of code that wxSmith controls. That end is marked by a //*) sign. So this mark has been moved to precede these three lines. Part 1 of our code will therefore be everything down to and including this line. The programmer should have no need to touch it save to allow Barnum to receive some variables from the program that calls it.
We will use the same device for showing how to put floating point numbers known only at run time into the grid. We will define them as floats, and show how to put a float, no matter where it came from, into the grid.
When it comes to displaying floating point numbers in the grid, however, we must deal with what appears to be an error in a couple of lines in the standard and most authoritative book on wxWidgets, Cross-Platform GUI Programming with wxWidgets by Smart and Hock. In the sole example given of a wxGrid, they write on page 348:
// We can specify that some cells will store numeric
// values rather than strings. Here we set grid column 5
// to hold floating point values displayed with width of 6
// and precision of 2
grid->SetColFormatFloat(5, 6, 2);
grid->SetCellValue(0, 6, "3.1415");
This passage appears at least 18 times on the Internet without anyone observing that it is totally misleading if not dead wrong. To begin with, the last line is out of date and won't compile, at least not with Code::Blocks. It can be easily updated to: grid->SetCellValue(0, 6,_("3.1415"));
But it does not illustrate the use of the SetColFormatFloat function. That command in the previous line applied to column 5 while this line puts a string – not a numeric value – into column 6, not 5. We can easily correct the column number: grid->SetCellValue(0, 5,_("3.1415"));
But it is still putting a wxString – not a numeric value, and certainly not a float – into the cell. It turns out that the assertion that “some cells will store numeric values rather than strings” is highly misleading at best. There is no elementary way to put anything other than a wxString into a cell of a wxGrid, nor to declare that a column will contain floats. The function of SetColFormatFloat() is quite different. The command
grid->SetColFormatFloat(5, 6, 2);
is used to give a uniform appearance to the column. It makes all strings in column 5 representing numbers with decimal places appear with the same width and precision. Thus, after this command, the string “3.14159” in column 5 will appear as 3.14 and the string “3.1” will appear as 3.10.
So then how do we show a floating point number in a wxGrid? We first have to convert it to a wxString and then put the string into the wxGrid. For example,
    float e = 2.71828;
    wxString cart;
    cart = wxString::Format(_T("%f"), e);
    Grid1->SetCellValue(1, 4, cart);
    Grid1->SetCellValue(1, 5, cart); // To show what SetColFormatFloat does.
Here cart is the wxString in which the numeric value of e rides into the grid. Column or row labels can be set from C-strings whose values are determined at runtime by first converting the C-string to a wxString, as illustrated here:
    char colone[10];        //colone is the variable C-string.
    strcpy(colone,"alpha");// Give it some content at run time.
    wxString ColumnName;    // Define a wxString which may be used repeatedly.
	 //Convert contents of the C-string to a wxString:
    ColumnName = wxString::FromUTF8(colone);
    Grid1->SetColLabelValue(0,ColumnName); // Set the column label.
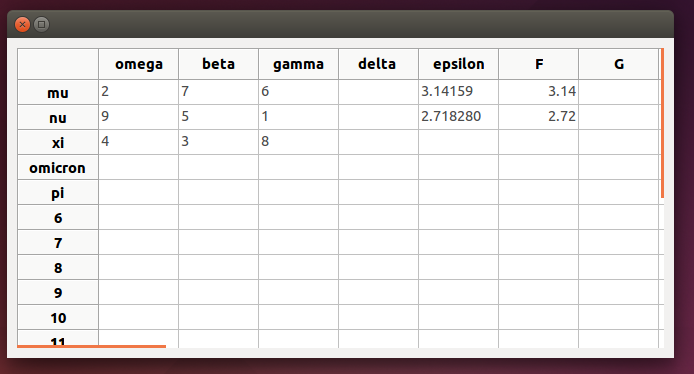
When these lines have been added to Barnum and the code compiled and run, we get the result shown below.
]
Note that the floating point numbers appear with their full number of decimal places in column 4 (labeled "epsilon")but in column 5 they have been rounded to 2 decimal places as a result of the SetColFormatFloat() function.
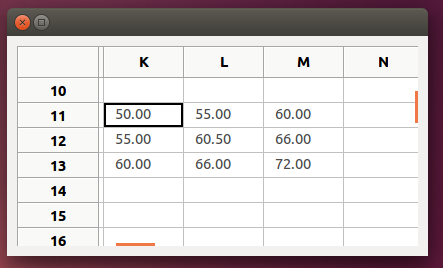
The last section of Part 2 shows how the wxString cart can be used over and over to carry numbers into the grid. The result is show below, where the window has been scrolled over and down to show the rectangle where the above code put numbers.
The result is shown below, where the window has been scrolled over and down to show the rectangle where the above code put numbers.
As for the square of integers in the upper left corner of the grid, it is “magic”; all rows, columns and diagonals have the same sum. Anyone venturing into wxGrid land is going to need all the magic he can get. But studying Barnum.cpp or other wxSmith code should be helpful. If it is hard to imagine how Smart and Hock could have thought that their very incomplete example was sufficient it is even more mind-boggling that BYO, the creator of wxSmith, was able to figure out what had to be done and make it all so easily available.


