Difference between revisions of "WxSmith tutorial: Working with multiple resources"
Greenbreen (talk | contribs) (Minor edits for clarity) |
|||
| (11 intermediate revisions by 4 users not shown) | |||
| Line 1: | Line 1: | ||
[[Category:wxSmith Documentation]] | [[Category:wxSmith Documentation]] | ||
| + | = Working with Multiple Windows = | ||
| + | In this tutorial, I'll show you how to create an application with more than one window. We will have, as usual, a main window; and in it we will create and show at the click of one button a wxFrame window and at the click of another button, a wxDialog window. One important difference between these two windows is that a wxDialog has the possibility of stopping the application until it is closed. It is generally used for asking the user a question or questions which demand answers before computation can proceed. Otherwise, the wxFrame generally has greater capabilities. | ||
| + | |||
| + | As usual, we will start with an empty project. Let's name the project "Tutorial_4". As always, remember to add the Close() statement. Check that the empty application compiles, runs and closes fine. | ||
| + | |||
| + | New windows can be added from the '''wxSmith''' menu item from the main menu of Code::Blocks. You can find there the following possibilities: | ||
| − | + | *'''Add wxPanel''' - this will add a new panel into the window | |
| + | *'''Add wxFloatingFrame''' – this will add Floating frame window | ||
| + | *'''Add wxDialog''' - this adds a new dialog window | ||
| + | *'''Add wxFrame''' - this adds a new frame window. | ||
| − | + | Let's first add a new wxDialog. When you choose this option you will see the following window: | |
| − | |||
| − | + | [[Image:wxs_tut04_001.png]] | |
| − | |||
| − | + | Here we can set the following parameters: | |
| + | *Class name - the name of the class which will be generated for the resource. It will also be the name of a resource | ||
| + | *Header file – the name of the header file with the class declaration | ||
| + | *Source file – the name of the source file with the class definition | ||
| + | *XRC file - if you check this option you can enter the name of an XRC file which will contain the XRC's structure (XRC files will be covered in a tutorial not yet written.) | ||
| + | *Add XRC file to autoload list - this option is available only with XRC files and notifies wxSmith that it should automatically load the XRC file when the application starts. | ||
| − | + | Now let's change the name of the window to something more distinctive like "FirstDialog". Note that if you change the class name, the names of the files are also updated. (More correctly, they are updated as long as you don't change them manually). | |
| − | + | After clicking OK, you will be prompted for a list of build targets into which the new window will be added. Select both ''debug'' and ''release'', and we can continue. | |
| + | |||
| + | A new dialog is automatically opened in the editor. In the top bar of the frame of the editor, note that there are two .wxs files available to the editor, Tutorial_4Frame.wxs and the newly created FirstDialog1.wxs. Both are completely blank. Into FirstDialog.wxs let's add some simple content so that it looks like this in the editor: | ||
| − | + | [[Image:wxs_tut04_002.png]] | |
| − | |||
| − | |||
| − | |||
| − | |||
| − | |||
| − | [[Image: | ||
| − | |||
| − | |||
| − | |||
| − | |||
| − | |||
| − | |||
| − | |||
| − | |||
| − | |||
| − | |||
| − | + | It is a good review exercise to figure out from this figure what has been done. It is very similar to what we did at the beginning of the previous tutorial. Before reading further, try your hand at making it. (To tell the truth, it doesn't matter much what you put in because all we are going to do with it is show it, But if you need a review, here is what I did: 1. Put a wxBoxSizer on the editor. 2. Put a wxPanel in the sizer (and remembered to turn on its Expand property). 3. Put on the panel a wxStaticBoxSizer, changed its orientation to Vertical, and set its label to “This is the first dialog.” 4. Into the StaticBoxSizer put first a wxTextCtrl and then a wxStaticText item.) At this point, the Show Preview button on the extreme right of the editor will show us what we have, while running the program will show nothing, because the application has no programming to show our dialog. | |
| − | + | Now let's go back to the wxSmith item on the Code::Blocks menu and add a wxFrame window (FirstFrame) and add some content into it: | |
| − | |||
| − | Now let's add | ||
[[Image:wxs_tut04_003.png]] | [[Image:wxs_tut04_003.png]] | ||
| − | + | Again, it is good review to make the window look like this, but the content is not critical for what follows. | |
| − | + | == Using a Dialog Window Modally == | |
| − | Now let's try to invoke our dialog. Generally such | + | Dialogs (but not frames) can be shown modally. When a dialog is shown modally, all other windows in the application are frozen until the dialog finishes its job. Modal dialogs are useful when the user must provide some information before computation can continue. For example, the window used to configure a new resource was shown modally. |
| + | |||
| + | Now let's try to invoke our dialog. Generally such dialogs will pop-up in reaction to some user action like choosing a menu option or clicking on a button. We will use a button since this approach is really easy. Let's switch into the main frame - the one that was opened right after creating the new project - and add a box sizer and button: | ||
| − | |||
[[Image:wxs_tut04_004.png]] | [[Image:wxs_tut04_004.png]] | ||
| − | Now we have to create action for button-click event. The easiest way is to double-click the button in editor. wxSmith will automatically add new event handler function: | + | |
| + | Now we have to create an action for the button-click event. The easiest way is to double-click the button in the editor. wxSmith will automatically add a new event handler function: | ||
void Tutorial_4Frame::OnButton1Click(wxCommandEvent& event) | void Tutorial_4Frame::OnButton1Click(wxCommandEvent& event) | ||
| Line 60: | Line 58: | ||
} | } | ||
| − | If you | + | If you don't see this code, scroll down to the end of the .cpp file. |
| − | + | In this frame, let's put the code to invoke our dialog: | |
| − | + | <pre> | |
| − | + | void Tutorial_4Frame::OnButton1Click(wxCommandEvent& event) | |
| − | + | { | |
| − | + | FirstDialog dialog(this); | |
| − | + | dialog.ShowModal(); | |
| + | } | ||
| + | </pre> | ||
| − | In the first added line we | + | In the first added line, we create the dialog's object and declare that ''this'' window (the main frame) is the parent of dialog. In the second line, we show the dialog modally. The call to ShowModal(), which is a function (or method) of the dialog, blocks everything else until the dialog is closed. |
| − | There's one more thing we need to add before our application | + | There's one more thing we need to add before our application will compile. Jump to the beginning of the file and add the following code after the first group of other includes: |
#include "FirstDialog.h" | #include "FirstDialog.h" | ||
| − | Note that you | + | Note that you should '''not''' add it inside code which looks like this: |
| − | + | <pre> | |
| − | + | //(*InternalHeaders(Tutorial_4Frame) | |
| − | + | #include <wx/intl.h> | |
| − | + | #include <wx/string.h> | |
| + | //*) | ||
| + | </pre> | ||
| − | This is block of code that is automatically generated by wxSmith. Every block starts with | + | This is a block of code that is automatically generated by wxSmith. Every block starts with a //(*BlockName comment and ends with a //*). You may find other similar blocks in both header and source files. If you change their content, all changes will be lost next time you change something in the editor. These comments and everything inside them belong to wxSmith, so don't mess with them. |
| − | To sum | + | To sum up, the headers section should look like this: |
| − | + | <pre> | |
| − | + | #include "wx_pch.h" | |
| − | + | #include "Tutorial_4Main.h" | |
| − | + | #include <wx/msgdlg.h> | |
| − | + | #include "FirstDialog.h" | |
| − | |||
| − | |||
| − | |||
| − | |||
| − | + | //(*InternalHeaders(Tutorial_4Frame) | |
| + | #include <wx/intl.h> | ||
| + | #include <wx/string.h> | ||
| + | //*) | ||
| + | </pre> | ||
| − | + | Now we can compile and run our application. If you click the button on the main window, this dialog will pop-up: | |
| − | |||
| − | + | [[Image:wxs_tut04_005.png]] | |
| − | + | == Using Modeless Dialogs and Frame Windows == | |
| − | |||
| + | Another way to show a window is as a modeless window. In such cases, the new window does not block other windows in the application and two (or more) windows can cooperate in one application. | ||
| + | Before we add new code into our application there's one more thing you should know. Each window may exist only as long as its object (the instance of the resource's c++ class) exists. So we cannot use the same approach as in the case of a modal dialog. In modal mode, an object was created as a local variable of the event handler by the simple declaration statement | ||
| − | + | FirstDialog dialog(this); | |
| − | + | We could do this only because the ShowModal method was blocking as long as the dialog was shown. Now with a wxFrame, which does not have the ShowModal possibility, we will have to create objects using the '''new''' operator of C++ because the objects must exist after leaving the handler function and also because windows not using modal mode will delete such objects automatically when the window is closed. | |
| − | |||
| − | |||
| − | |||
| − | |||
| − | + | To allow creating the FirstFrame class we should add #include "FirstFrame.h" into the list of includes just as in the case of FirstDialog: | |
| − | + | <pre> | |
| − | + | #include "wx_pch.h" | |
| − | + | #include "Tutorial_4Main.h" | |
| + | #include <wx/msgdlg.h> | ||
| + | #include "FirstDialog.h" | ||
| + | #include "FirstFrame.h" | ||
| + | |||
| + | //(*InternalHeaders(Tutorial_4Frame) | ||
| + | #include <wx/intl.h> | ||
| + | #include <wx/string.h> | ||
| + | //*) | ||
| + | </pre> | ||
| − | Now let's add two more buttons to main frame: | + | Now let's add two more buttons to the main frame: |
| − | * Add new dialog | + | *Add new dialog |
| − | * Add new frame | + | *Add new frame |
We can also name the first button to show what it does: | We can also name the first button to show what it does: | ||
| + | |||
[[Image:wxs_tut04_006.png]] | [[Image:wxs_tut04_006.png]] | ||
| − | Now let's add handler to ''Add new dialog'' button: | + | Now let's add a handler to the ''Add new dialog'' button: |
| − | + | <pre> | |
| − | + | void Tutorial_4Frame::OnButton2Click(wxCommandEvent& event) | |
| − | + | { | |
| − | + | FirstDialog* dlg = new FirstDialog(this); | |
| − | + | dlg->Show(); | |
| + | } | ||
| + | </pre> | ||
| − | + | Analogously, we can write the code for FirstFrame: | |
| − | + | <pre> | |
| − | + | void Tutorial_4Frame::OnButton3Click(wxCommandEvent& event) | |
| − | + | { | |
| − | + | FirstFrame* frm = new FirstFrame(this); | |
| − | + | frm->Show(); | |
| + | } | ||
| + | </pre> | ||
| − | Now each time we click ''Add new dialog'' or ''Add new frame'' | + | Now each time we click the ''Add new dialog'' or ''Add new frame'' button, a new window shows up. |
| + | This is the end of this tutorial. I hope that you learned some new and useful things. We have covered the use of two of the four things you can add to your project by using the wxSmith item on the Code::Blocks main menu. In the next tutorial, I'll show how to use another of the four, namely the wxPanel. | ||
| − | + | ---- | |
| − | + | <center>'''[[WxSmith tutorial: Building more complex window|Previous]] | [[WxSmith tutorials|Index]] | [[WxSmith tutorial: Using wxPanel resources|Next]]'''</center> | |
Latest revision as of 13:56, 12 May 2013
Working with Multiple Windows
In this tutorial, I'll show you how to create an application with more than one window. We will have, as usual, a main window; and in it we will create and show at the click of one button a wxFrame window and at the click of another button, a wxDialog window. One important difference between these two windows is that a wxDialog has the possibility of stopping the application until it is closed. It is generally used for asking the user a question or questions which demand answers before computation can proceed. Otherwise, the wxFrame generally has greater capabilities.
As usual, we will start with an empty project. Let's name the project "Tutorial_4". As always, remember to add the Close() statement. Check that the empty application compiles, runs and closes fine.
New windows can be added from the wxSmith menu item from the main menu of Code::Blocks. You can find there the following possibilities:
- Add wxPanel - this will add a new panel into the window
- Add wxFloatingFrame – this will add Floating frame window
- Add wxDialog - this adds a new dialog window
- Add wxFrame - this adds a new frame window.
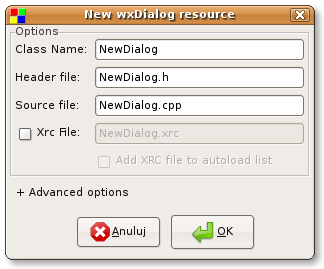
Let's first add a new wxDialog. When you choose this option you will see the following window:
Here we can set the following parameters:
- Class name - the name of the class which will be generated for the resource. It will also be the name of a resource
- Header file – the name of the header file with the class declaration
- Source file – the name of the source file with the class definition
- XRC file - if you check this option you can enter the name of an XRC file which will contain the XRC's structure (XRC files will be covered in a tutorial not yet written.)
- Add XRC file to autoload list - this option is available only with XRC files and notifies wxSmith that it should automatically load the XRC file when the application starts.
Now let's change the name of the window to something more distinctive like "FirstDialog". Note that if you change the class name, the names of the files are also updated. (More correctly, they are updated as long as you don't change them manually).
After clicking OK, you will be prompted for a list of build targets into which the new window will be added. Select both debug and release, and we can continue.
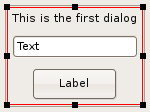
A new dialog is automatically opened in the editor. In the top bar of the frame of the editor, note that there are two .wxs files available to the editor, Tutorial_4Frame.wxs and the newly created FirstDialog1.wxs. Both are completely blank. Into FirstDialog.wxs let's add some simple content so that it looks like this in the editor:
It is a good review exercise to figure out from this figure what has been done. It is very similar to what we did at the beginning of the previous tutorial. Before reading further, try your hand at making it. (To tell the truth, it doesn't matter much what you put in because all we are going to do with it is show it, But if you need a review, here is what I did: 1. Put a wxBoxSizer on the editor. 2. Put a wxPanel in the sizer (and remembered to turn on its Expand property). 3. Put on the panel a wxStaticBoxSizer, changed its orientation to Vertical, and set its label to “This is the first dialog.” 4. Into the StaticBoxSizer put first a wxTextCtrl and then a wxStaticText item.) At this point, the Show Preview button on the extreme right of the editor will show us what we have, while running the program will show nothing, because the application has no programming to show our dialog.
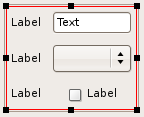
Now let's go back to the wxSmith item on the Code::Blocks menu and add a wxFrame window (FirstFrame) and add some content into it:
Again, it is good review to make the window look like this, but the content is not critical for what follows.
Using a Dialog Window Modally
Dialogs (but not frames) can be shown modally. When a dialog is shown modally, all other windows in the application are frozen until the dialog finishes its job. Modal dialogs are useful when the user must provide some information before computation can continue. For example, the window used to configure a new resource was shown modally.
Now let's try to invoke our dialog. Generally such dialogs will pop-up in reaction to some user action like choosing a menu option or clicking on a button. We will use a button since this approach is really easy. Let's switch into the main frame - the one that was opened right after creating the new project - and add a box sizer and button:
Now we have to create an action for the button-click event. The easiest way is to double-click the button in the editor. wxSmith will automatically add a new event handler function:
void Tutorial_4Frame::OnButton1Click(wxCommandEvent& event)
{
}
If you don't see this code, scroll down to the end of the .cpp file.
In this frame, let's put the code to invoke our dialog:
void Tutorial_4Frame::OnButton1Click(wxCommandEvent& event)
{
    FirstDialog dialog(this);
    dialog.ShowModal();
}
In the first added line, we create the dialog's object and declare that this window (the main frame) is the parent of dialog. In the second line, we show the dialog modally. The call to ShowModal(), which is a function (or method) of the dialog, blocks everything else until the dialog is closed.
There's one more thing we need to add before our application will compile. Jump to the beginning of the file and add the following code after the first group of other includes:
#include "FirstDialog.h"
Note that you should not add it inside code which looks like this:
//(*InternalHeaders(Tutorial_4Frame)
#include <wx/intl.h>
#include <wx/string.h>
//*)
This is a block of code that is automatically generated by wxSmith. Every block starts with a //(*BlockName comment and ends with a //*). You may find other similar blocks in both header and source files. If you change their content, all changes will be lost next time you change something in the editor. These comments and everything inside them belong to wxSmith, so don't mess with them.
To sum up, the headers section should look like this:
#include "wx_pch.h"
#include "Tutorial_4Main.h"
#include <wx/msgdlg.h>
#include "FirstDialog.h"

//(*InternalHeaders(Tutorial_4Frame)
#include <wx/intl.h>
#include <wx/string.h>
//*)
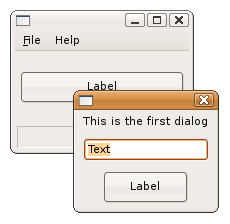
Now we can compile and run our application. If you click the button on the main window, this dialog will pop-up:
Using Modeless Dialogs and Frame Windows
Another way to show a window is as a modeless window. In such cases, the new window does not block other windows in the application and two (or more) windows can cooperate in one application. Before we add new code into our application there's one more thing you should know. Each window may exist only as long as its object (the instance of the resource's c++ class) exists. So we cannot use the same approach as in the case of a modal dialog. In modal mode, an object was created as a local variable of the event handler by the simple declaration statement
FirstDialog dialog(this);
We could do this only because the ShowModal method was blocking as long as the dialog was shown. Now with a wxFrame, which does not have the ShowModal possibility, we will have to create objects using the new operator of C++ because the objects must exist after leaving the handler function and also because windows not using modal mode will delete such objects automatically when the window is closed.
To allow creating the FirstFrame class we should add #include "FirstFrame.h" into the list of includes just as in the case of FirstDialog:
#include "wx_pch.h"
#include "Tutorial_4Main.h"
#include <wx/msgdlg.h>
#include "FirstDialog.h"
#include "FirstFrame.h"

//(*InternalHeaders(Tutorial_4Frame)
#include <wx/intl.h>
#include <wx/string.h>
//*)
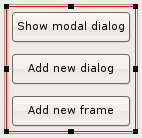
Now let's add two more buttons to the main frame:
- Add new dialog
- Add new frame
We can also name the first button to show what it does:
Now let's add a handler to the Add new dialog button:
void Tutorial_4Frame::OnButton2Click(wxCommandEvent& event)
{
    FirstDialog* dlg = new FirstDialog(this);
    dlg->Show();
}
Analogously, we can write the code for FirstFrame:
void Tutorial_4Frame::OnButton3Click(wxCommandEvent& event)
{
    FirstFrame* frm = new FirstFrame(this);
    frm->Show();
}
Now each time we click the Add new dialog or Add new frame button, a new window shows up.
This is the end of this tutorial. I hope that you learned some new and useful things. We have covered the use of two of the four things you can add to your project by using the wxSmith item on the Code::Blocks main menu. In the next tutorial, I'll show how to use another of the four, namely the wxPanel.
