Difference between revisions of "Using wxGrid"
| Line 3: | Line 3: | ||
Creating such a grid with wxSmith is easy once you know how, but figuring out how from the general documentation can consume many hours. But here is the secret in brief. | Creating such a grid with wxSmith is easy once you know how, but figuring out how from the general documentation can consume many hours. But here is the secret in brief. | ||
| − | Create a basic wxWidgets application as described in preceding tutorials. Then click the “wxSmith” item in the Code::Blocks main menu. Add a wxDialog. (Do not be tempted to add a wxScrollingDialog.) Call it MatGridDialog. The name does not matter, but that was the name I used and is the name for this dialog as shown in the accompanying pictures. (“Mat” was short for “matrix”.) | + | Create a basic wxWidgets application as described in preceding tutorials. Then click the “wxSmith” item in the Code::Blocks main menu. Add a wxDialog. (Do not be tempted to add a wxScrollingDialog; that is something altogether different with a special purpose. See the Julian Smart and Kevin Hock book ''Cross-Platform GUI Programming with wxWidgets.'') Call it MatGridDialog. The name does not matter, but that was the name I used and is the name for this dialog as shown in the accompanying pictures. (“Mat” was short for “matrix”.) |
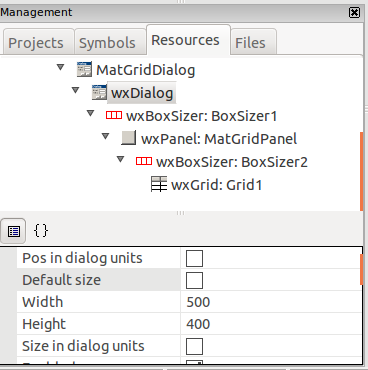
| − | Now in the “Management” pane on the left side of the Code::Blocks window, click on the “Resources” tab. You should see something like the first two lines of the picture | + | Now in the “Management” pane on the left side of the Code::Blocks window, click on the “Resources” tab. You should see something like the first two lines of the picture below. Click on the “wxDialog” line, and – in the editor pane of Code::Blocks – drop a box sizer (found on the Layout tab) onto wxDialog. Onto it drop a wxPanel (from the Standard tab) and onto it another box sizer, and finally drop into the sizer a wxGrid from the Advanced tab. |
Now click on the wxDialog and use its Properties panel to clear the “Default size” square and to set the width to 500 and the height to 400. These numbers are in pixels. Their exact value does not matter much because the user will soon resize the box with the mouse, but this choice gives a starting point which we will actually narrow in a moment. | Now click on the wxDialog and use its Properties panel to clear the “Default size” square and to set the width to 500 and the height to 400. These numbers are in pixels. Their exact value does not matter much because the user will soon resize the box with the mouse, but this choice gives a starting point which we will actually narrow in a moment. | ||
Revision as of 15:49, 12 August 2016
A grid can be a useful way to display data, especially matrices of numbers. If the matrices are large, the full grid will be too big for the screen, so we will want to display it in modest proportions but allow the user to resize it and scroll about in it with the mouse.
Creating such a grid with wxSmith is easy once you know how, but figuring out how from the general documentation can consume many hours. But here is the secret in brief.
Create a basic wxWidgets application as described in preceding tutorials. Then click the “wxSmith” item in the Code::Blocks main menu. Add a wxDialog. (Do not be tempted to add a wxScrollingDialog; that is something altogether different with a special purpose. See the Julian Smart and Kevin Hock book Cross-Platform GUI Programming with wxWidgets.) Call it MatGridDialog. The name does not matter, but that was the name I used and is the name for this dialog as shown in the accompanying pictures. (“Mat” was short for “matrix”.)
Now in the “Management” pane on the left side of the Code::Blocks window, click on the “Resources” tab. You should see something like the first two lines of the picture below. Click on the “wxDialog” line, and – in the editor pane of Code::Blocks – drop a box sizer (found on the Layout tab) onto wxDialog. Onto it drop a wxPanel (from the Standard tab) and onto it another box sizer, and finally drop into the sizer a wxGrid from the Advanced tab.
Now click on the wxDialog and use its Properties panel to clear the “Default size” square and to set the width to 500 and the height to 400. These numbers are in pixels. Their exact value does not matter much because the user will soon resize the box with the mouse, but this choice gives a starting point which we will actually narrow in a moment.
Click on the left half of the Properties panel and with the down arrow key move down until you see the word Style and to its left a + sign in a little box. Click on the + sign and run the cursor down to be sure that the window has a Close and a Maximize button. Be sure to click the last item: Full_Repaint_ on_Resize. Do not give the dialog scrollbars; the wxGrid provides its own scrollbars.
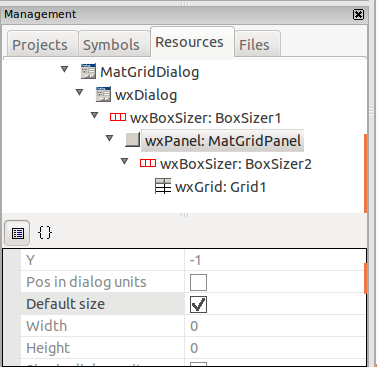
The next item down, the MatGridPanel, seems to require no change in its properties. We can even use the default size.
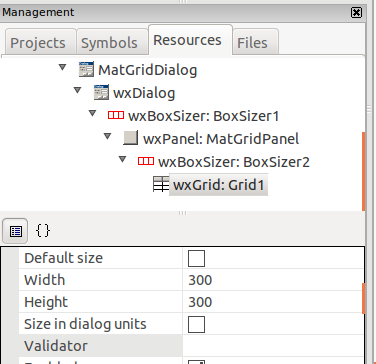
So proceed to click on the wxGrid in the Resources tab of the Management pane. In the Grid's properties, clear the Default size box and set the width and height to 300. Probably these numbers must be smaller than the corresponding numbers in the wxDialog above it.
Click the + to the left of “Style” and click the Full_Repaint_on_Resize box. Finally, click the Expand box. It would not be there had we not put in BoxSizer2. Do not click any scrollbars.
In the editor area, you should see the grid and the scrollbars should work. Click the “Show preview” button on the far right of the screen under the big red X. You should see the grid and the scrollbars should work.
It seems to be important to avoid the use of the default sizes for the wxDialog and the grid, to keep the specified size of the grid well below that of the wxDialog, and not to use scrollbars on anything – because the grid always provides its own.


