Difference between revisions of "Creating a simple "Hello World" plugin"
| Line 21: | Line 21: | ||
[[Image:Plugindevelop_2.jpg]] | [[Image:Plugindevelop_2.jpg]] | ||
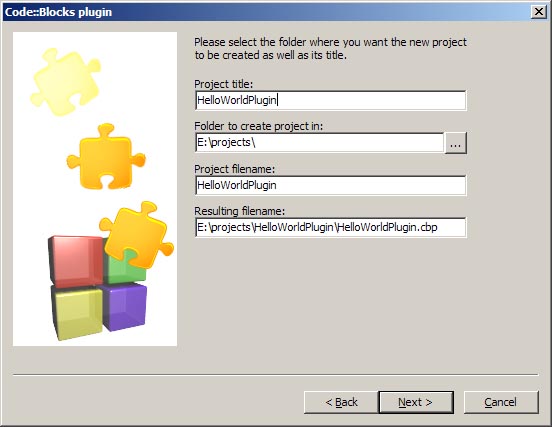
| − | In the first edit field write the title of your project. You can see that we | + | In the first edit field write the title of your project. You can see that we denoted the project title as '''HelloWordPlugin'''. The other field are self-explanatory. If you click the Next button you will see the next plugin property dialog: |
[[Image:Plugindevelop_3.jpg]] | [[Image:Plugindevelop_3.jpg]] | ||
Revision as of 09:02, 28 November 2006
You can help the Code::Blocks Wiki by updating the article.
NOTE: This tutorial was written using the Code::Blocks final beta under windows.
Prerequisites
This tutorial assumes you have a working version of Code::Blocks installed and some knowledge of how to deal with projects, in particular how to compile them. In order to use the Code::Blocks SDK you must also have a working version of wxWidgets installed. For more information see Compiling wxWidgets 2.6.2 to develop Code::Blocks
To develop Code::Blocks plugins you will also need a copy of the Code::Blocks SDK, which can be found on the Code::Blocks download page. Install this to somewhere sensible that you will remember later on. Personally I keep the SDK in a folder called CodeBlocks\sdk (which contains the include/ and lib/ from in the zip). This means that the header files refered to in the tutorial would be found under Codeblocks\sdk\include, so cbPlugin.h is Codeblocks\sdk\include\cbPlugin.h for example.
Overview
This tutorial will guide you through the creation of a simple "Hello World" plugin, which when activated displays "Hello World!" in the Code::Blocks log tab below the editor. This could be done completely by hand, but Code::Blocks contains a very useful plugin project generator (which, incidentally, is a plugin itself), so we'll use that.
Creating the Plugin Project
Select the File->New->Project option from the main menu bar and choose the Code::Blocks Plugin Wizard. You will see a dialog box with some information but you can skip that after reading it. Now you will see the following dialog box:
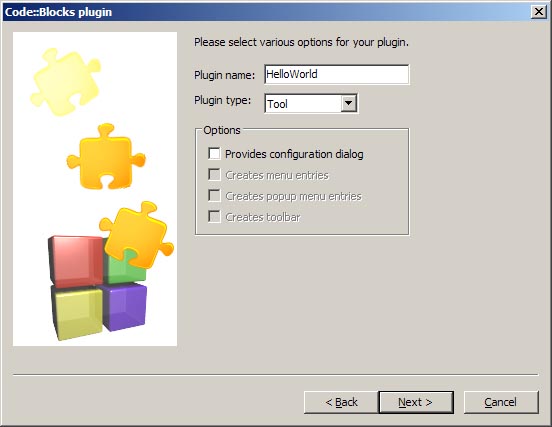
In the first edit field write the title of your project. You can see that we denoted the project title as HelloWordPlugin. The other field are self-explanatory. If you click the Next button you will see the next plugin property dialog:
Let's denote the plugin name with HelloWorld. After clicking the next button a new dialog apears and you can edit a bunch of information about your plugin. In the next step you can choose which compiler you want to use for your plugin project.
Plugin Type
The Code::Blocks SDK contains interfaces for various different types of plugins in the cbPlugin.h file. The drop down Plugin type list in the wizard allows you to select which type of plugin you wish to build - essentially which class the main plugin interface class will inherit from. We want to build a Tool plugin, so select that from the list. Tool type plugins are added to the Plugins main menu submenu automatically, and their Execute method is called when they are selected by the user. We will use this later in order to display our message.
Plugin Info
The Plugin name field is the name of the plugin interface class which the wizard will create. Enter "HelloWorldPlugin" here. More information can be provided by clicking on the Enter Plugin Info button. The fields here are fairly self explanitory, but one which you should pay particular attention to is the Title field, since this is what Code::Blocks will use to refer to the plugin in the menus. In the generated code, the plugin info is kept in the plugin class' m_PluginInfo member, which is of the type PluginInfo and is set in the plugin interface class' constructor. PluginInfo is detailed in cbPlugin.h, if you want to go take a look.
Provides Configuration Dialog
This indicates whether or not the plugin is to provide a configuration dialog which can be accessed through the Settings->Configure Plugins submenu. We don't need one, so leave this box unchecked.
Filenames
The filenames should have been filled in automatically by the dialog when you entered the Plugin name, if you used the name "HelloWorldPlugin", for example, these should be helloworldplugin.h and helloworldplugin.cpp respectively. If you want to change the names of the files generated, this is where to do it (this tutorial will assume you have left them as the default values).
The guard-block box is simply if you wish to place inclusion guards in the header file, and if you do what symbol to use. If you don't know what these are then just leave it as it is.
Click Create and take note of the next dialog box's message about the SDK include and library directories, that's what we'll be dealing with next.
Letting the project know where to find the SDK
Code::Blocks should have created a new project called "Custom Plugin". Before we can compile anything we need to make sure that the compiler knows where the sdk files are in order to include headers and link the libraries. If your compiler has not been setup to know where wxWidgets is yet then this must also be done (see the links in Prerequisites for more details).
Right click on the project and select Build Options then the Directories tab. Here, make sure the Compiler tab is selected then click on the Add button. Browse to where you unzipped the SDK and select the include directory (for example C:\CodeBlocks\sdk\include if you installed the SDK there), then click okay and select whether or not the path should remain relative. Go to the "Linker" tab and add the "lib" directory under where the SDK was installed in similar fashion (following my install, this would be in C:\CodeBlocks\sdk\lib).
Linker Options
If you click on the Linker Options tab at the top level in the Build Options dialog, you will see that the plugin is being linked to the Code::Blocks core library (codeblocks) and the wxWidgets library (wxmsw242 under windows NOTE: The plugin generator uses 2.4.2, if you're using a different version of wxWidgets then change this).
Compiler Options
The Compiler Options tab shows that several symbols have been defined when the plugin is compiled: __GNUWIN32__, WXUSINGDLL and BUILDING_PLUGIN in this case (using windows). The first two are indicators to wxWidgets of the compiler and DLL options to use, and the last is an indicator to the Code::Blocks SDK headers that they are being used to build a plugin (which affects whether or not symbols are exported or imported for the DLL - see cbPlugin.h for example).
Adding Functionality
The plugin wizard should have generated us helloworldplugin.h and helloworldplugin.cpp. The header file contains the class definition and a C function declaration which is used to load the plugin when asked by the main Code::Blocks program (GetPlugin). What we're interested in, however, is the definition of the class methods in helloworldplugin.cpp. The plugin wizard has generated us a constructor in which the m_PluginInfo information is set, and three methods. OnAttatch and OnRelease are methods called to inform the plugin when it is attached (the user has selected it and Code::Blocks has loaded it) or released (Code::Blocks no longer has a use for it or is shutting down). Since our plugin does not need to perform any actions on loading or shutting down, we can leave these as they are.
The Execute method, as mentioned earlier, is what we are really interested in. We are going to use the MessageManager class to add a log message in the window beneath the editor. To do this we will need access to both the Manager class and the MessageManager class. Manager is and internal Code::Blocks class which is used to keep track of internal information and the various task specific managers (like the MessageManager and EditorManager - which is used to keep track of all the open files and their editors). MessageManager is responsible for both normal output and debugging output (see messagemanager.h for more details). Replace the generated Execute method with this new one:
int HelloWorldPlugin::Execute()
{
    if( !IsAttached() )
        return -1;
    Manager::Get()->GetMessageManager()->Log( _("Hello World!") );
    return 0;
}
This new method uses the Manager's static Get method to return the singleton Manager object, then uses that to access the MessageManager through the GetMessageManager method. MessageManager has a method called Log which appends a string to the bottom of the output log, so we use this to add the "Hello World!" message. The _() construct is part of wxWidgets' internationalisation utilities, and more information on it can be found in the wxWidgets documentation.
The first two lines check to see if the plugin has been attatched (in other words selected by the user in the Plugins->Manage plugins menu), and thus whether it should perform any action at all. As far as I can tell, the return value of Execute is not used anywhere, but all the default plugins use -1 for failure and 0 for success (much like the main function in a C program) so that is what is used here.
Add headfiles to helloworldplugin.cpp
#include <manager.h>
#include <messagemanager.h>
Now we have our code in place we are ready to...
Compile! (And test)
(New) The time is right and we should compile the project. The next step is to install the plugin. Go to the Plugins->Manage plugins option. Hit the Install new button. The manager ask you where the plugin lies. Go to that folder and select the *.cbplugin file. Code::Blocks imports your plugin automatically. If this procedure was successful you can see your plugin in the Installed plugins list. To execute your plugin go to the Plugins menu and choose your plugin. That's all.
(Old) This should produce a file called HelloWorldPlugin.dll, which can be tested by copying to the CodeBlocks\share\CodeBlocks\plugins\ directory and restarting Code::Blocks. There should now be an option in the Plugins menu for "Hello World" (or whatever the title field was set to when the plugin was generated - or in m_PluginInfo). Click on this and "Hello World!" should appear in the Code::Blocks logging window. Congratulations, you've just created your first plugin!
Further Information
It is essential to learn how wxWidgets works if you seriously plan on working on plugins, since most of Code::Blocks depends on it, and you will find it easier to add and manipulate components if you have a firm grasp of its principles. More information on this can be found in the wxWidgets documentation. Another good place to learn from is the source code from the existing Code::Blocks plugins, which can be downloaded along with the rest of the Code::Blocks source code from the download page.
Hopefully this tutorial has helped you work through a few fundamentals in terms of creating plugins, happy coding!

