Installing Uniwin remote compiler
What is Uniwin
If you already know what Uniwin is and what it does, please skip to the next section.
This is from Uniwin's readme file:
Uniwin is a ssh/sftp based toolset to develop C/C++ systems on remote Unix servers (including all Unix systems supporting ssh and sftp) based on Windows clients. By automatically synchronizing the source files on the client with the server and replacing GNU toolsets with some small stubs for them, Uniwin presents a seamless interface for remote development. Nothing needs to be changed to your favorite development environment just like you are developing on a local system. With a simple configuration procedure, all operations such as editing, compiling, and debugging will be exactly same as developing a local program.
Uniwin also can be used as an automatical SFTP file synchronizing system between local Windows client and remote server. Another usage of Uniwin may be treating it as a FTP to SFTP Bridge. In fact, a fully functioned, multi-threaded FTP to SFTP Bridge is incorporated into the package to support the team synchronizing tools provided by eclipse.
The advantage of Uniwin is it brings no change to you but providing a remote development environment in the backend.
The rest of this document will describe everything needed to setup a valid Code::Blocks/Uniwin combination.
Installing Uniwin
The first step is to download Uniwin. You can get it now by clicking here. Once the file is downloaded you may extract it in any location you like. For the rest of this document I will assume you installed it on the root of the C: drive (e.g. C:\Uniwin).
The next step is to configure it. To do this now, launch C:\Uniwin\Uniwin.exe.
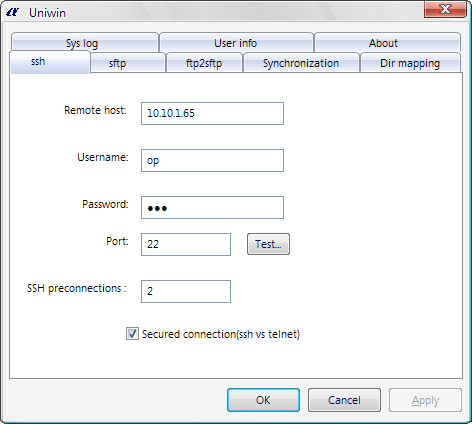
The "ssh" page defines the SSH connection settings for the build commands. You need to adjust the fields for your setup:
- Remote host: The name or IP address of the unix host you will build your software on.
- Username: Your username on the remote unix host.
- Password: Your password.
- Leave the rest as they are. They 're sensible defaults.
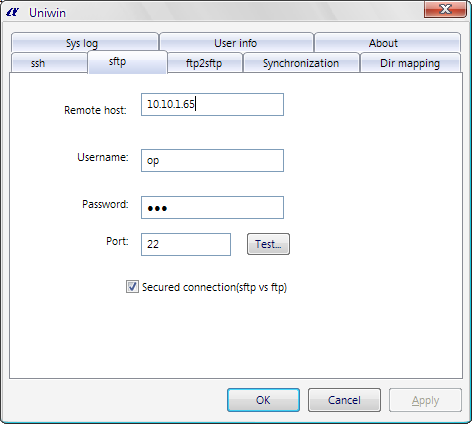
Now switch to the "sftp" page. SFTP is used to synchronize the local directory with the remote one and vice-versa.
Edit the top three fields and use the same values as those you used in the "ssh" page.
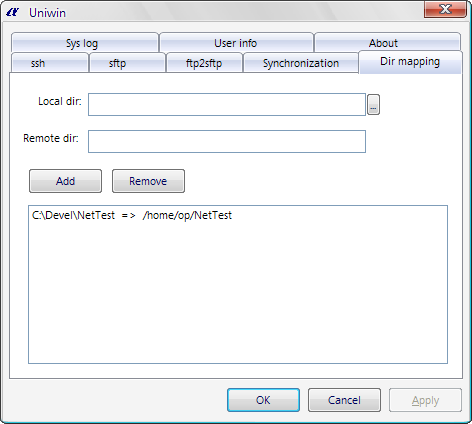
Next, switch to the "Dir mapping" page. In this page you "map" local directories to remote ones.
In the picture above you can see that I have defined one directory mapping:
C:\Devel\NetTest --> /home/op/NetTest
What this does is keep those two directories (local and remote) synchronized when any file/folder is changed.
You can add as many directory mappings as you like. Usually one is enough though (the base directory of your workspace/project).
That was all the configuration that was needed. Pretty easy, huh? :). Now click the OK button. This will close the Uniwin configuration dialog.
Very important note:
Uniwin must be running while you work on a project that uses it. This means that you should launch the Uniwin configuration before building a project with Uniwin and let it run while you work on that project. To hide Uniwin out of sight, hit the Close button on the top-right of the window (do not click OK or Cancel). This will shove it to systray and let it run there.
Configuring Code::Blocks for Uniwin
The "hard part" is over now. You can return to the comfortable Code::Blocks environment (pun intended) to configure it to use Uniwin ;).
What you need to do is add a new compiler. To do this, click on the menu "Settings->Compiler and debugger". The dialog that comes up will read "Global compiler settings", which what we want.
Now, make sure you have the "GNU GCC Compiler" selected in the "Selected compiler" section:
Click the "Copy" button. Code::Blocks will ask you to enter a name for the new compiler. Use "GCC (Uniwin)" as the name. An informational message will appear. Click OK to close it and switch to the "Programs" page.
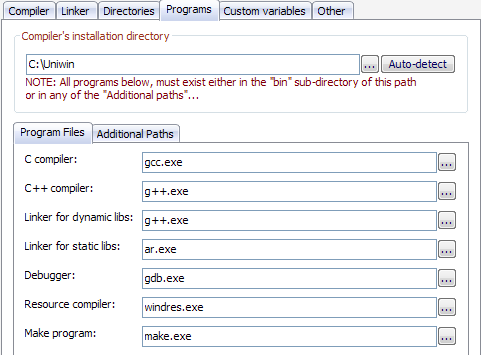
Change the installation directory and programs like shown below:
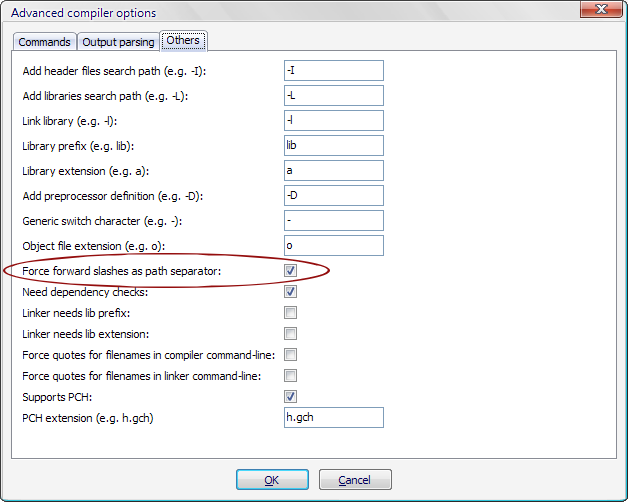
Once done, switch to the "Other" page and click the button labeled "Advanced options...". In the new dialog that opens, switch to the "Others" page:
Check the box labeled "Force forward slash as path separator".
That's it! This wasn't so hard, was it?
Configuring a project for Uniwin
This is the easiest part of all :). Just select the newly added compiler for each project you want to build using Uniwin.
Don't forget to run Uniwin.exe before trying to build a project using this compiler.
