Linking the plugin to a Nightly Build
This article describes how to assemble your plugin to work with officially released Code::Blocks distribution (either nightly or not) on Windows. It's accomplished by linking your plugin against the DLL's shipped with Code::Blocks.
Introduction
Is useful to know how to compile Code::Blocks sources from scratch to link with our plugin, but when we want to share it with the community then we need to link it against the latest nightly build or final release of Code::Blocks. This is a simple procedure that many people don't know at first. Enjoy :)
Procedure
Step One - Get Binaries
Download and install version of Code::Blocks you would like to link your plugin with. You may choose either official release available from https://www.codeblocks.org/downloads/5 or latest nightly from this forum - /index.php/board,20.0.html
Step Two - Get Sources
To ensure your plugin will run smoothly with chosen C::B version you need headers and libraries of this version as well as headers and libraries for wxWidgets library used by this Code::Blocks.
Headers and libraries alone constitute SDK. In CB case headers are distributed with sources, libraries come with CB or can be recompiled from source if needed. Get sources for your required version of Code::Blocks from SVN if you haven't done so already.
wxWidgets libraries need to be compiled (or configured) or else you will most probably get "wx/setup.h: No such file or directory" message. Get version used to build your C::B at http://wxwidgets.org
Step Three - Build Plugin
Try to compile the plugin after building wxWidgets. It is ok if you got a message "cannot find -lcodeblocks" from ld.exe It means that codeblocks library for linking plugin is missing, because library paths were not setup correctly. Next step will fix this.
Step Four - Link Everything Together
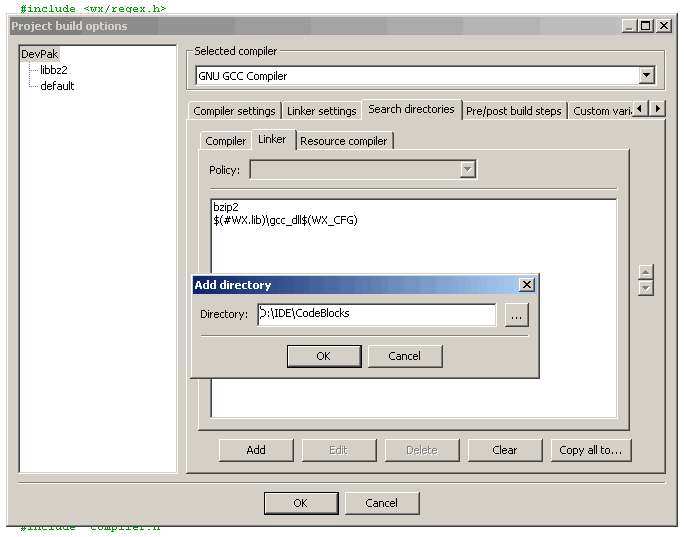
After having your plugin compiled (or up and running if you prefer) you will need to edit the project build options and add the directory where your official release or nightly is residing to the linker. Project -> Build Options... -> Search directories -> Linker
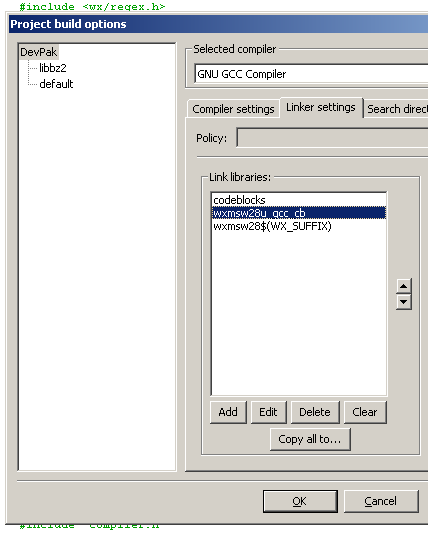
Then add names of the needed libraries to the linker to assemble the plugin. These are wxmsw28u_gcc_cb.dll and codeblocks.dll. You don't need to write the .dll extension or the lib prefix (if present) so they will look like this on the linker options:
- codeblocks
- wxmsw28u_gcc_cb
Step Five - Package
Wrap your plugin in .cbplugin archive as described in Managing Plug-in Resources page.
Conclusion
You should now be able to compile the plugin and load it to the current nightly without the symbols error. A problem that many developers confront after compiling the plugin with a compilation that differs from the official one.
Good Luck!

