Using wxGrid
A grid can be a useful way to display data, especially matrices of numbers. If the matrices are large, the full grid will be too big for the screen, so we will want to display it in modest proportions but allow the user to resize it or scroll about in it with the mouse.
Like so many things related to computing, creating such a grid with wxSmith is easy once you know how, but figuring out how can consume many hours. What follows is the distilled result of such a trial-and-error process, and it is but a work in progress. At present, it shows how to create a grid with scroll bars with wxSmith and how to display it from a running program with the click of a button. But so far, the grid is all blank; putting data into it and getting that data displayed properly is the next step.
Create a new wxWidgets application. Call it DiaGrid and make it frame-based. We don't want the grid showing all the time, only when we call it up. So we need to add a Frame or Dialog as we did back in Tutorial 4. For ease in avoiding memory leaks, we will use a Dialog, hence the name DiaGrid.
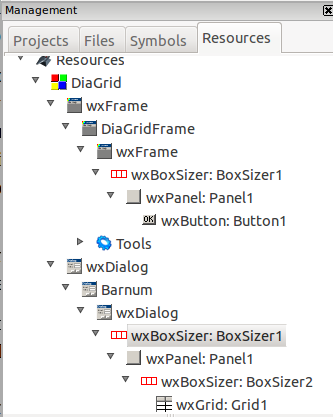
Click on the wxSmith tab of the CodeBlocks main menu and click “Add wxDialog”. Call it Barnum. (Why Barnum? I first used names with “grid” and “dialog” but wxSmith also uses “dialog” a lot and “grid” has a specific meaning. The names became very confusing; something unique was needed. P.T. Barnum was a master American circus showman; since we are trying to show a grid that shows data, “Barnum” seemed as good choice as any.) Drop a box sizer into the frame. Into the sizer put a panel and check the panel's Expand property. Onto the panel drop another box sizer. Into it put a wxGrid from the “Advanced” tab of wxSmith. The lower part of the Management pane should now look as shown on the right.
Click on the wxGrid and set its number of columns to 40 and number of rows to 40; uncheck the Default size box and set the width to 400 and height to 300. (These numbers are in pixels. It is very important to unckeck that Default size box.) Click on the + inside a □ next to the word Style to drop down a list of Style features; check the box for wxFullRepaintOnResize. Finally, check the Expand box. At this point you should see encouraging signs on the right; a grid has appeared.
If you click the “Show preview” button over on the right (just under the big red X) a grid appears and you can scroll around in it. It is pretty small, but if you try to stretch it with the mouse, you will find that it won't stretch. We have forgotten something. Click on that wxDialog just under Barnum in the Resources pane. Click on the + in the square next to “Style” in is properties box. Scroll down until you get to wxRESIZE-BORDER and check it. Do the same with the wxDialog above Barnum. Now the grid should stretch.
Now that we have a grid in our frame, we need a way to show it from the running program. The simplest way is to have a button which, when clicked, will show the frame and with it the grid. So in the editor area of Code::Blocks click on the DiaGridframe.wxs tab. Drop onto it a box sizer and into the box sizer a panel, and onto the panel a button. Change the button's label to “ShowGrid” and double click the button.
You are thrown into DiaGridMain.cpp. Down at the bottom of the file you will find that an empty frame has been created for you to specify what to do when that button is clicked. The frame looks like this:
void DiaGridFrame::OnButton1Click(wxCommandEvent& event)
{
}
And you fill it in to look like this:
void DiaGridFrame::OnButton1Click(wxCommandEvent& event)
{
   Barnum *pt = new Barnum(this);
   pt->ShowModal();
   delete pt;
}
The choice of pt as the name of created instance is arbitrary; the letters are just old Barnum's initials. Everything else has to be just as it is. Because we have used “ShowModal”, the program does not get to the “delete” line until the user has closed the dialog with the grid. But because we then promptly “delete” the instance of Barnum – that is to say, we release the space in memory which the “new” command grabbed for it – we should not experience any memory leaks.
There is one more thing that must be done before the program will compile. wxSmith created a header file to go with Barnum but it did not “include” it in the main program. We must do so. Run the scrollbar up to the top of DiaGridMain.cpp. The first non-comment lines you see are these:
	#include "wx_pch.h"
	#include "MatGridMain.h"
	#include <wx/msgdlg.h>
Just below them add:
#include "Barnum.h"
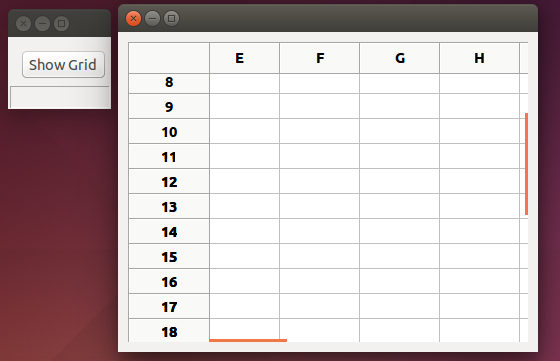
Now click the Code::Blocks “Build and run” button. The code should compile, link and begin executing. But only a small frame with a button labeled “Show Grid” appears. Click the button, and the grid should appear. You should be able to drag the edges or corners of the grid to enlarge it, and the scroll bars should work. Here is a picture of it working. The user has scrolled down and over to the right before this screenshot was taken.
Of course, there is nothing in the grid. That comes next.

