Creating a simple but useful plugin
NOTE: This is a work in progress. Also, if you have access to a non-Windows platform, please test to ensure interoperability.
Prerequisites
You may want to read the tutorial Creating a simple "Hello_World" plugin before starting this tutorial.
This tutorial assumes you have read through at least some of the wxSmith tutorials, have a working version of Code::Blocks installed and some knowledge of how to deal with projects, in particular how to compile them. To use the Code::Blocks SDK you must also have a working version of wxWidgets installed.
Overview
This tutorial will guide you through the creation of a simple plugin, which acquires settings from the user to run upx on the project output.
Setting up the environment
Select the Plugin type: of Tool from the Code::Blocks Plugin Wizard. Select wxSmith->Add wxScrollingDialog. Select use Xrc File:. Add the xrc resource to the current project through Project->Add Files.... (This is not necessary, however, it is preferred as it ensures all files stay together.) Add the xrc resource to the plugin's resource zip through selecting Project->Build options..., navigating to default->Pre/post build steps and appending the xrc resource (PopUp.xrc) to the end of the first command 'zip -j9 Upx.zip manifest.xml'. A proper setup is key, as, for example, failing to add the xrc resource to the plugin's resources will mysteriously crash Code::Blocks whenever the plugin is run.
Drafting the UI
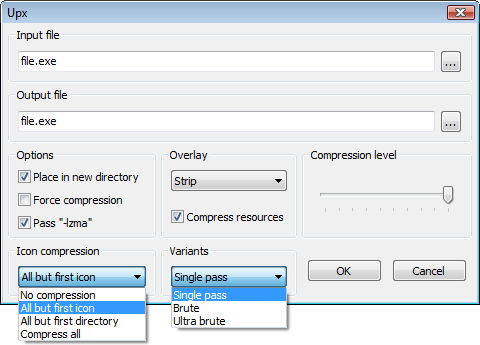
Assuming you have read through some of the wxSmith tutorials, constructing a dialog (off the wxScrollingDialog base added in the previous section) with these features should not be too difficult. The compression slider is set for 1-10, wxButtons were used for the OK and Cancel (not a wxStdDialogButtonSizer), and the Overlay drop-down includes copy and skip.
You can, of course, choose to add or remove as many features as you would like.
Adding functionality
The first point is to call the dialog when the plugin is executed. This can be achieved by changing the content (in the main source file, Upx.cpp) of the function
Upx.cpp
int Upx::Execute()
{
    // do your magic ;)
    NotImplemented(_T("Upx::Execute()"));
    return -1;
}
to
Upx.cpp
int UPX::Execute()
{
    PopUp dlg( Manager::Get()->GetAppWindow() );
    dlg.ShowModal();
    return 0;
}
See the sdk documentation for full information on managers (and everything else).
Next, add an event handler to the OK button through wxSmith. This function will contain most of the action as very little needs to happen before or after it. There are two main jobs this fuction must complete: forming a command, and executing it.
