Difference between revisions of "Installing Code::Blocks from source on Windows"
(add svn image) |
(the new cb_cpp_std global variable) |
||
| (309 intermediate revisions by 11 users not shown) | |||
| Line 1: | Line 1: | ||
[[Category:Installing Code::Blocks]] | [[Category:Installing Code::Blocks]] | ||
[[Category:Installing Code::Blocks from source]] | [[Category:Installing Code::Blocks from source]] | ||
| + | == Overview == | ||
| + | |||
| + | === Self-Hosting === | ||
| + | |||
| + | The build process described on this page is a kind of "[https://en.wikipedia.org/wiki/Self-hosting Self-Hosting]." You use an existing version of Code::Blocks to compile the next version. When that version is proven to function correctly it is used to compile the next, and so on. | ||
| + | |||
== Prerequisites == | == Prerequisites == | ||
| − | + | === Bootstrap Code::Blocks === | |
| + | |||
| + | A properly working Code::Blocks is required to compile the next SVN version. A [[Installing_Code::Blocks_nightly_build_on_Windows | Nightly Build]] is a good candidate to use. It will be paired with a MinGW compiler in the next item. | ||
| + | |||
| + | === MinGW Compiler === | ||
| + | |||
| + | At the present time, Code::Blocks only compiles successfully with a MinGW compiler toolchain on Windows. You will need a complete, working [[MinGW installation]]. | ||
| + | |||
| + | === wxWidgets === | ||
| − | + | wxWidgets is the "[https://en.wikipedia.org/wiki/Graphical_user_interface graphical user interface toolkit]" that Code::Blocks is built on top of. | |
| − | |||
| − | + | For information about wxWidgets, see their official site ➡ [https://www.wxwidgets.org/ wxWidgets.org] | |
| − | + | You can use any version of wxWidgets >= 3.1.3, but the latest stable release will work better. At this moment it is wx3.2.4, download it in [https://github.com/wxWidgets/wxWidgets/releases/download/v3.2.4/wxWidgets-3.2.4.zip zip] or [https://github.com/wxWidgets/wxWidgets/releases/download/v3.2.4/wxWidgets-3.2.4.7z 7z] format. | |
| − | + | === Utilities === | |
| − | === | + | ZIP and SVN functions are not required to run Code::Blocks but ZIP is required to build it and a SVN client is strongly recommended but not absolutely necessary. |
| + | |||
| + | ==== ZIP ==== | ||
| + | |||
| + | You will need a command-line <tt>zip.exe</tt> program. Some toolchains include it, if yours does not then the recommended one can be found on the [[MinGW installation#Development Tools|Development Tools]] page. You do ''not'' need WinZip. | ||
| + | |||
| + | Make sure <tt>zip.exe</tt> is in your [https://en.wikipedia.org/wiki/PATH_(variable) PATH] as it is used both during the compilation in your current version of Code::Blocks and also by the <tt>update.bat</tt> script. | ||
| + | |||
| + | ==== SVN ==== | ||
| + | |||
| + | It is recommended, but not required, that you install a SVN client. If you are a absolute beginner in programming skip this part and go to [https://wiki.codeblocks.org/index.php/Installing_Code::Blocks_from_source_on_Windows#Code::Blocks_Sources Code::Blocks Sources]. An example would be [http://tortoisesvn.net/downloads TortoiseSVN] if you would like an all-in-one SVN solution. ''TortoiseSVN'' includes optional command-line client tools, which you should install as they provide a command-line SVN client. Choosing to install the command-line client tools will automatically add them to your PATH. However, if you do not wish to have the ''TortoiseSVN'' Explorer extensions in your right-click context menu or just don't feel a need for a graphical client in particular then you can use another: [http://subversion.apache.org/packages.html SVN command-line client] equally well. Just make sure that whichever client you install has its executable in your PATH. | ||
| + | |||
| + | The <tt>autorevision</tt> tool which is used during the build of Code::Blocks makes use of the <tt>svn.exe</tt> binary if it is available (in your PATH) and also uses the SVN meta-data generated by a SVN checkout. If you have both a SVN command-line client in your PATH, and the meta-data, the resulting build of Code::Blocks will show the revision on the loading splash window, the Start here page, and in the About dialog (shown here in the About dialog, indicated by the red arrow): | ||
| − | [ | + | [[Image:About_SVN10627.png]] |
| − | Code::Blocks | + | === Code::Blocks Sources === |
| − | |||
| − | + | If you don't wish to use a SVN utility, you can download a snapshot from [https://sourceforge.net/p/codeblocks/code/HEAD/tree/ here] clicking on "Download Snapshot". Now you can go on to the [https://wiki.codeblocks.org/index.php/Installing_Code::Blocks_from_source_on_Windows#Build_wxWidgets_Support_Library next section] | |
| − | + | The last item is to acquire the Code::Blocks source code. Follow the appropriate instructions for whether you have a graphical or command line SVN client. | |
| − | + | ==== TortoiseSVN ==== | |
| − | + | If you prefer a graphical SVN client you can use ''TortoiseSVN'' - make a directory where you want to store the sources, right-click on the directory, and select "'''SVN Checkout'''," and as shown you will get a checkout dialog: | |
| + | [[Image:Tor_SVN.png]] | ||
| − | + | In the URL of the repository box, enter <tt><nowiki>svn://svn.code.sf.net/p/codeblocks/code/trunk</nowiki></tt> and verify the checkout directory is where you would like it to be. The example given here is "''C:\cb_svn''" - once satisfied with the arguments click the OK button to process the checkout. | |
| − | === SVN | + | ==== Command-Line SVN ==== |
| − | + | If you do not wish to use a graphical SVN client then a command-line equivalent to the above is to use the <tt>svn</tt> command - open a command prompt, make a directory, change into that directory, and then checkout a copy of the repository: | |
| − | |||
| − | + | mkdir codeblocks-head | |
| + | cd codeblocks-head | ||
| + | svn checkout <nowiki>svn://svn.code.sf.net/p/codeblocks/code/trunk</nowiki> | ||
| + | == Build wxWidgets Support Library == | ||
| − | + | === Configure Build Options === | |
| − | + | Please note that support has been removed for wxWidgets < 3.1.3 because it lacks Direct2D support. | |
| − | |||
| − | |||
| − | + | Unpack the wxWidgets zip file to a directory of your choice, open a command-line prompt, and navigate to the directory <tt>build/msw</tt> inside the wxWidgets directory. In this directory there is a text file named <tt>config.gcc</tt> which you can edit with notepad to control the build options. There are two lines to note, <tt>CFLAGS ?=</tt> and <tt>CXXFLAGS ?=</tt>. The options given here will go in either or both of those lines. | |
| − | + | If your linker runs out of memory while building use: | |
| − | If | ||
| − | + | -fno-keep-inline-dllexport | |
| − | + | Some versions of the MinGW Windows Runtime Library will cause an error during compilation. See [https://sourceforge.net/p/tdm-gcc/bugs/269/ Bug #269]. If this is the case with the toolchain you are using then try this workaround: | |
| − | + | -D_WIN32_IE=0x0603 | |
| − | + | To silence warnings that can significantly slow down the compilation process: | |
| − | + | -Wno-unused-local-typedefs | |
| − | + | and | |
| − | + | -Wno-deprecated-declarations | |
| − | + | All of these options apply to both <tt>CFLAGS</tt> and <tt>CXXFLAGS</tt> so the two lines containing all the options would look like this: | |
| − | + | CFLAGS ?= -fno-keep-inline-dllexport -D_WIN32_IE=0x0603 -Wno-unused-local-typedefs -Wno-deprecated-declarations | |
| − | + | CXXFLAGS ?= -fno-keep-inline-dllexport -D_WIN32_IE=0x0603 -Wno-unused-local-typedefs -Wno-deprecated-declarations | |
| − | |||
| − | |||
| − | == | + | === Build wxWidgets Library === |
| − | + | First you must edit include\wx\msw\setup.h; locate a line containing | |
| − | + | #define wxUSE_GRAPHICS_DIRECT2D 0 | |
| − | + | and change it to | |
| − | + | #define wxUSE_GRAPHICS_DIRECT2D 1 | |
| − | |||
| − | |||
| − | + | If you can not find setup.h please copy setup0.h to setup.h | |
| − | + | At a command-line, inside the <tt>build/msw</tt> directory, use the following commands to build wxWidgets: | |
| − | + | mingw32-make -f makefile.gcc SHARED=1 MONOLITHIC=1 BUILD=release UNICODE=1 clean | |
| − | + | mingw32-make -f makefile.gcc SHARED=1 MONOLITHIC=1 BUILD=release UNICODE=1 | |
| − | + | or, if you want to build using multiple threads: | |
| − | + | mingw32-make -f makefile.gcc SHARED=1 MONOLITHIC=1 BUILD=release UNICODE=1 clean | |
| + | mingw32-make -f makefile.gcc SHARED=1 MONOLITHIC=1 BUILD=release UNICODE=1 setup_h | ||
| + | mingw32-make -f makefile.gcc -j8 SHARED=1 MONOLITHIC=1 BUILD=release UNICODE=1 | ||
| − | + | If your compiler toolchain is not in your PATH (it should be on a development machine), then put it in your path first: | |
| − | + | set PATH=X:\path\to\toolchain\bin;%PATH% | |
| − | + | Where "'''''X'''''" is the drive letter, and "'''''\path\to\toolchain\bin'''''" is where your toolchain is located. | |
| − | + | If your compilation fails for any reason then make sure to run the ''clean'' line before trying again. | |
| − | + | == Build Code::Blocks == | |
| − | + | === Self-Hosting === | |
| − | + | All the preparation work is now complete and we can actually perform a self-hosting compile of the next Code::Blocks with our current one. If you do not make any changes to your non-Code::Blocks prepared items, like your MinGW compiler version, and the wxWidgets library, then when building subsequent SVN versions of Code::Blocks you can keep all the preparation from a previous build and start with this section. When restarting from this point you can refresh your current Code::Blocks local source with ''TortoiseSVN''. Right-click on your local source directory, go to "TortoiseSVN" in the context-menu, then choose "update to revision." The "head" is always the latest version. If you are using a command-line SVN, just run <tt>svn update</tt> in the root of your local source directory. | |
| − | + | === Open project === | |
| − | + | This guide uses wx3.1, you can use wx3.2 just replacing 31 with 32 where needed. | |
| − | |||
| − | + | Open the project file '''CodeBlocks_wx31.cbp''' (or '''CodeBlocks_wx31_64.cbp''' for 64-bit mode). | |
| − | + | *You will be prompted to define the global variable $(#wx31). In the base field, enter the root of the location where you unpacked wxWidgets. | |
| − | + | *You will also be prompted to enter the global variable '''cb_release_type'''. Here you can add compiler optimization or debug-flags. Enter '''-g''' in the '''base''' field as a default or any other options you require for your specific needs. | |
| − | + | [[Image:Global_Variables.png]] | |
| − | + | [[Image:Global_wx.png]] | |
| − | |||
| − | |||
| − | + | If you would like to build Code::Blocks against with the wx 3.3.1+ library, you need to set another global variable named '''cb_cpp_std''', and currently, you should set it to '''-std=gnu++11''' | |
| − | === | + | === Prevent unnecessary warnings === |
| − | + | Building Code::Blocks against the wxWidgets library will generate an excessive amount of warnings during the compilation. This can significantly impact the time it takes to compile both the main project and the contributors workspace as each warning has to be printed to the build log. To silence these warnings, go to Compiler Settings: | |
| − | |||
| − | + | [[Image:Compiler_Settings.png]] | |
| − | |||
| − | |||
| − | + | And under the "Compiler settings" tab (red arrow), "Other compiler options" sub-tab (green arrow), enter "<tt>-Wno-unused-local-typedefs</tt>" (blue arrow), and you may also add "<tt>-Wno-deprecated-declarations</tt>" on its own line here too. | |
| − | + | [[Image:Unused_Local_Typedefs.png]] | |
| − | + | === Compile project === | |
| − | + | Make sure that "All" is selected as the target (blue arrow), and then click the Build icon (red arrow). | |
| − | + | [[Image:Compile_All.png]] | |
| − | + | If everything builds correctly your build messages should end with no errors. | |
| − | + | [[Image:Build_Log.png]] | |
| − | |||
| − | |||
| − | + | === Copy wxWidgets support DLL === | |
| + | After the compilation has finished, copy <tt>lib\gcc_dll\wxmsw31u_gcc_custom.dll</tt> from the wxWidgets directory to the <tt>devel31</tt> (or <tt>devel31_64</tt> for 64-bit) directory in the Code::Blocks <tt>src</tt> directory. If you are confident enough you can copy it instead to System32 (on 32 bits Windows) or SysWOW64 (on 64 bits Windows). | ||
| − | + | [[Image:Update_Devel_Output.png]] | |
| − | + | The <tt>devel31</tt> directory is created by compiling the Code::Blocks project in Code::Blocks. | |
| − | + | === Generate Production Output === | |
| + | Move to the <tt>src</tt> directory) and run <tt>update_31.bat</tt>. This will pack the resource files and copy the executables, libraries, and plugins to the <tt>output_31</tt> directory. It will also create the <tt>output_31</tt> directory if it does not exist. If you are compiling the 64-bit version please call <tt>update_31_64.bat</tt> and use folders <tt>devel_31_64</tt> and <tt>output_31_64</tt>. | ||
| − | + | [[Image:Update_bat.png]] | |
| − | + | The stripped ("production") executable is found in <tt>output_31</tt> directory together with all libraries and data files. If you want a version with debug symbols instead (caution: huge size!), use the one found in the <tt>devel_31</tt> directory. | |
| − | + | [[Image:Update_Output.png]] | |
| − | |||
| − | |||
| − | + | === Compile contributed (or your own) plugins === | |
| − | + | The workspace file '''ContribPlugins_wx31.workspace''' (or '''ContribPlugins_wx31_64.workspace''' for 64-bit compilation) contains the project files for all contributed plugins. Open that workspace and compile the plugins which you would like to use (or select "Build workspace" from the Build menu if you want them all). | |
| − | |||
| − | |||
| − | + | The NassiShneiderman plugin has a dependency on the "[http://www.boost.org/ Boost]" library. If you do not wish to use that plugin and therefore not need the library, just right-click on that plugin and choose "close project." | |
| − | + | Don't forget to run <tt>update_31.bat</tt> or <tt>update_31_64.bat</tt> again after building the contributed plugins. | |
| − | + | [[Image:Build_Workspace.png]] | |
| − | + | == Install Code::Blocks == | |
| − | + | Copy or move the <tt>output_31</tt> or <tt>output_31_64</tt> directory to where you want Code::Blocks to reside. Then you probably want to rename the directory to something else. You can also optionally right-click on <tt>codeblocks.exe</tt> and choose "Create shortcut" and then rename that shortcut to your liking and move it to another location such as your desktop for easy access. | |
| − | + | If you want to run Code::Blocks on a machine without your compiler toolchain being in the PATH then you will likely have to include, in the same directory as the <tt>codeblocks.exe</tt> is fine, support .dll files from your compiler toolchain. The easiest way to determine the required files is to not have your compiler toolchain in your PATH and repeatedly run Code::Blocks and copy over each .dll it says is missing until all have been found. | |
Latest revision as of 07:25, 25 September 2025
Overview
Self-Hosting
The build process described on this page is a kind of "Self-Hosting." You use an existing version of Code::Blocks to compile the next version. When that version is proven to function correctly it is used to compile the next, and so on.
Prerequisites
Bootstrap Code::Blocks
A properly working Code::Blocks is required to compile the next SVN version. A Nightly Build is a good candidate to use. It will be paired with a MinGW compiler in the next item.
MinGW Compiler
At the present time, Code::Blocks only compiles successfully with a MinGW compiler toolchain on Windows. You will need a complete, working MinGW installation.
wxWidgets
wxWidgets is the "graphical user interface toolkit" that Code::Blocks is built on top of.
For information about wxWidgets, see their official site ➡ wxWidgets.org
You can use any version of wxWidgets >= 3.1.3, but the latest stable release will work better. At this moment it is wx3.2.4, download it in zip or 7z format.
Utilities
ZIP and SVN functions are not required to run Code::Blocks but ZIP is required to build it and a SVN client is strongly recommended but not absolutely necessary.
ZIP
You will need a command-line zip.exe program. Some toolchains include it, if yours does not then the recommended one can be found on the Development Tools page. You do not need WinZip.
Make sure zip.exe is in your PATH as it is used both during the compilation in your current version of Code::Blocks and also by the update.bat script.
SVN
It is recommended, but not required, that you install a SVN client. If you are a absolute beginner in programming skip this part and go to Code::Blocks Sources. An example would be TortoiseSVN if you would like an all-in-one SVN solution. TortoiseSVN includes optional command-line client tools, which you should install as they provide a command-line SVN client. Choosing to install the command-line client tools will automatically add them to your PATH. However, if you do not wish to have the TortoiseSVN Explorer extensions in your right-click context menu or just don't feel a need for a graphical client in particular then you can use another: SVN command-line client equally well. Just make sure that whichever client you install has its executable in your PATH.
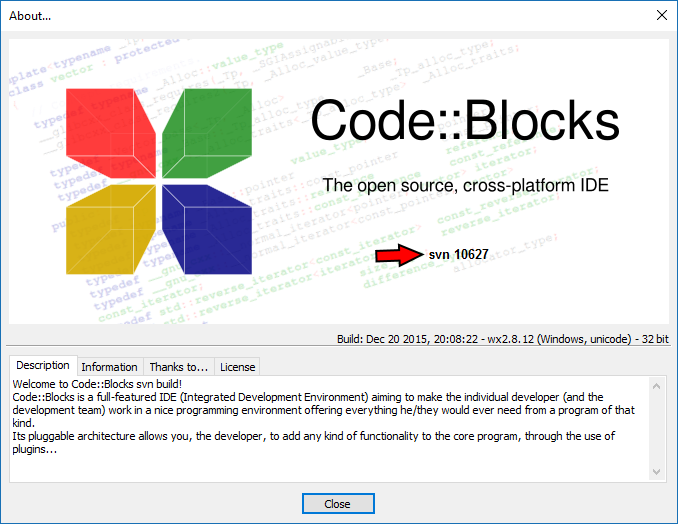
The autorevision tool which is used during the build of Code::Blocks makes use of the svn.exe binary if it is available (in your PATH) and also uses the SVN meta-data generated by a SVN checkout. If you have both a SVN command-line client in your PATH, and the meta-data, the resulting build of Code::Blocks will show the revision on the loading splash window, the Start here page, and in the About dialog (shown here in the About dialog, indicated by the red arrow):
Code::Blocks Sources
If you don't wish to use a SVN utility, you can download a snapshot from here clicking on "Download Snapshot". Now you can go on to the next section
The last item is to acquire the Code::Blocks source code. Follow the appropriate instructions for whether you have a graphical or command line SVN client.
TortoiseSVN
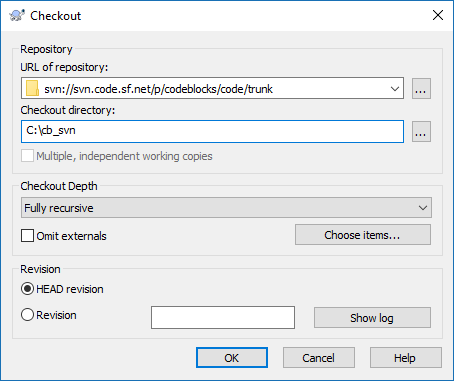
If you prefer a graphical SVN client you can use TortoiseSVN - make a directory where you want to store the sources, right-click on the directory, and select "SVN Checkout," and as shown you will get a checkout dialog:
In the URL of the repository box, enter svn://svn.code.sf.net/p/codeblocks/code/trunk and verify the checkout directory is where you would like it to be. The example given here is "C:\cb_svn" - once satisfied with the arguments click the OK button to process the checkout.
Command-Line SVN
If you do not wish to use a graphical SVN client then a command-line equivalent to the above is to use the svn command - open a command prompt, make a directory, change into that directory, and then checkout a copy of the repository:
mkdir codeblocks-head
cd codeblocks-head
svn checkout svn://svn.code.sf.net/p/codeblocks/code/trunk
Build wxWidgets Support Library
Configure Build Options
Please note that support has been removed for wxWidgets < 3.1.3 because it lacks Direct2D support.
Unpack the wxWidgets zip file to a directory of your choice, open a command-line prompt, and navigate to the directory build/msw inside the wxWidgets directory. In this directory there is a text file named config.gcc which you can edit with notepad to control the build options. There are two lines to note, CFLAGS ?= and CXXFLAGS ?=. The options given here will go in either or both of those lines.
If your linker runs out of memory while building use:
-fno-keep-inline-dllexport
Some versions of the MinGW Windows Runtime Library will cause an error during compilation. See Bug #269. If this is the case with the toolchain you are using then try this workaround:
-D_WIN32_IE=0x0603
To silence warnings that can significantly slow down the compilation process:
-Wno-unused-local-typedefs
and
-Wno-deprecated-declarations
All of these options apply to both CFLAGS and CXXFLAGS so the two lines containing all the options would look like this:
CFLAGS ?= -fno-keep-inline-dllexport -D_WIN32_IE=0x0603 -Wno-unused-local-typedefs -Wno-deprecated-declarations
CXXFLAGS ?= -fno-keep-inline-dllexport -D_WIN32_IE=0x0603 -Wno-unused-local-typedefs -Wno-deprecated-declarations
Build wxWidgets Library
First you must edit include\wx\msw\setup.h; locate a line containing
#define wxUSE_GRAPHICS_DIRECT2D 0
and change it to
#define wxUSE_GRAPHICS_DIRECT2D 1
If you can not find setup.h please copy setup0.h to setup.h
At a command-line, inside the build/msw directory, use the following commands to build wxWidgets:
mingw32-make -f makefile.gcc SHARED=1 MONOLITHIC=1 BUILD=release UNICODE=1 clean
mingw32-make -f makefile.gcc SHARED=1 MONOLITHIC=1 BUILD=release UNICODE=1
or, if you want to build using multiple threads:
mingw32-make -f makefile.gcc     SHARED=1 MONOLITHIC=1 BUILD=release UNICODE=1 clean
mingw32-make -f makefile.gcc     SHARED=1 MONOLITHIC=1 BUILD=release UNICODE=1 setup_h
mingw32-make -f makefile.gcc -j8 SHARED=1 MONOLITHIC=1 BUILD=release UNICODE=1
If your compiler toolchain is not in your PATH (it should be on a development machine), then put it in your path first:
set PATH=X:\path\to\toolchain\bin;%PATH%
Where "X" is the drive letter, and "\path\to\toolchain\bin" is where your toolchain is located.
If your compilation fails for any reason then make sure to run the clean line before trying again.
Build Code::Blocks
Self-Hosting
All the preparation work is now complete and we can actually perform a self-hosting compile of the next Code::Blocks with our current one. If you do not make any changes to your non-Code::Blocks prepared items, like your MinGW compiler version, and the wxWidgets library, then when building subsequent SVN versions of Code::Blocks you can keep all the preparation from a previous build and start with this section. When restarting from this point you can refresh your current Code::Blocks local source with TortoiseSVN. Right-click on your local source directory, go to "TortoiseSVN" in the context-menu, then choose "update to revision." The "head" is always the latest version. If you are using a command-line SVN, just run svn update in the root of your local source directory.
Open project
This guide uses wx3.1, you can use wx3.2 just replacing 31 with 32 where needed.
Open the project file CodeBlocks_wx31.cbp (or CodeBlocks_wx31_64.cbp for 64-bit mode).
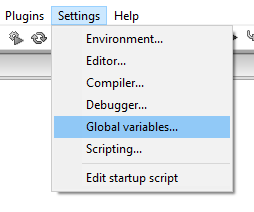
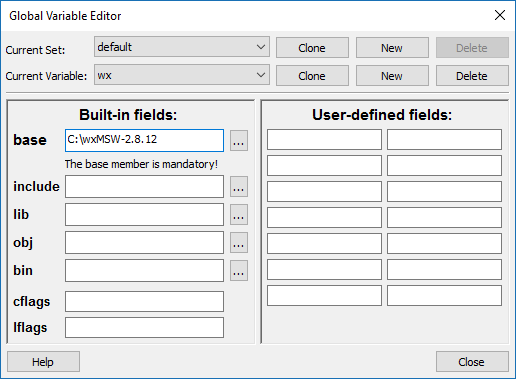
- You will be prompted to define the global variable $(#wx31). In the base field, enter the root of the location where you unpacked wxWidgets.
- You will also be prompted to enter the global variable cb_release_type. Here you can add compiler optimization or debug-flags. Enter -g in the base field as a default or any other options you require for your specific needs.
If you would like to build Code::Blocks against with the wx 3.3.1+ library, you need to set another global variable named cb_cpp_std, and currently, you should set it to -std=gnu++11
Prevent unnecessary warnings
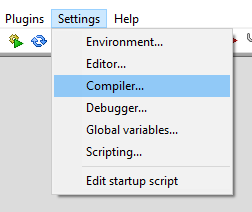
Building Code::Blocks against the wxWidgets library will generate an excessive amount of warnings during the compilation. This can significantly impact the time it takes to compile both the main project and the contributors workspace as each warning has to be printed to the build log. To silence these warnings, go to Compiler Settings:
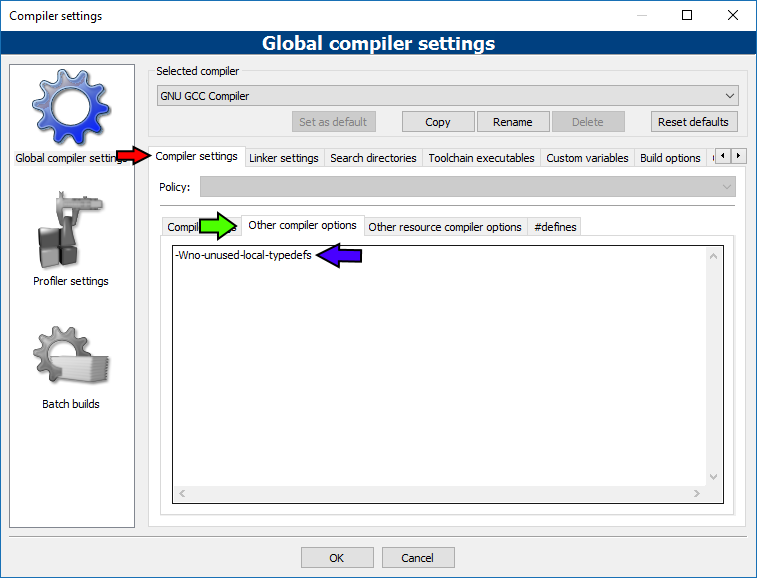
And under the "Compiler settings" tab (red arrow), "Other compiler options" sub-tab (green arrow), enter "-Wno-unused-local-typedefs" (blue arrow), and you may also add "-Wno-deprecated-declarations" on its own line here too.
Compile project
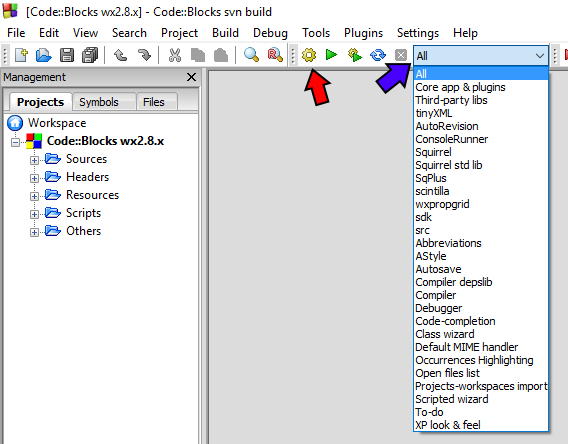
Make sure that "All" is selected as the target (blue arrow), and then click the Build icon (red arrow).
If everything builds correctly your build messages should end with no errors.
Copy wxWidgets support DLL
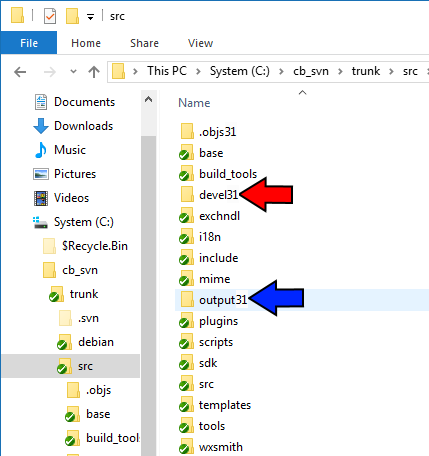
After the compilation has finished, copy lib\gcc_dll\wxmsw31u_gcc_custom.dll from the wxWidgets directory to the devel31 (or devel31_64 for 64-bit) directory in the Code::Blocks src directory. If you are confident enough you can copy it instead to System32 (on 32 bits Windows) or SysWOW64 (on 64 bits Windows).
The devel31 directory is created by compiling the Code::Blocks project in Code::Blocks.
Generate Production Output
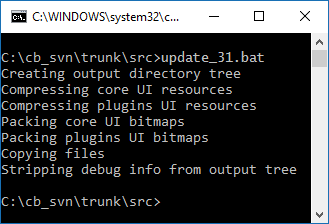
Move to the src directory) and run update_31.bat. This will pack the resource files and copy the executables, libraries, and plugins to the output_31 directory. It will also create the output_31 directory if it does not exist. If you are compiling the 64-bit version please call update_31_64.bat and use folders devel_31_64 and output_31_64.
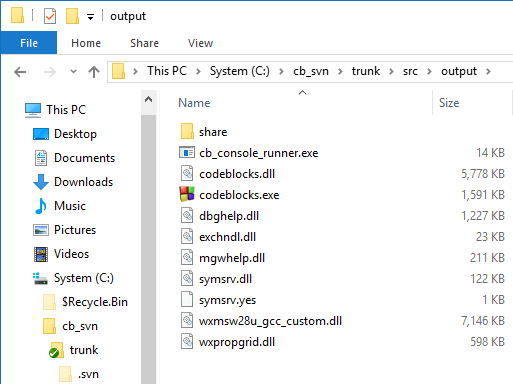
The stripped ("production") executable is found in output_31 directory together with all libraries and data files. If you want a version with debug symbols instead (caution: huge size!), use the one found in the devel_31 directory.
Compile contributed (or your own) plugins
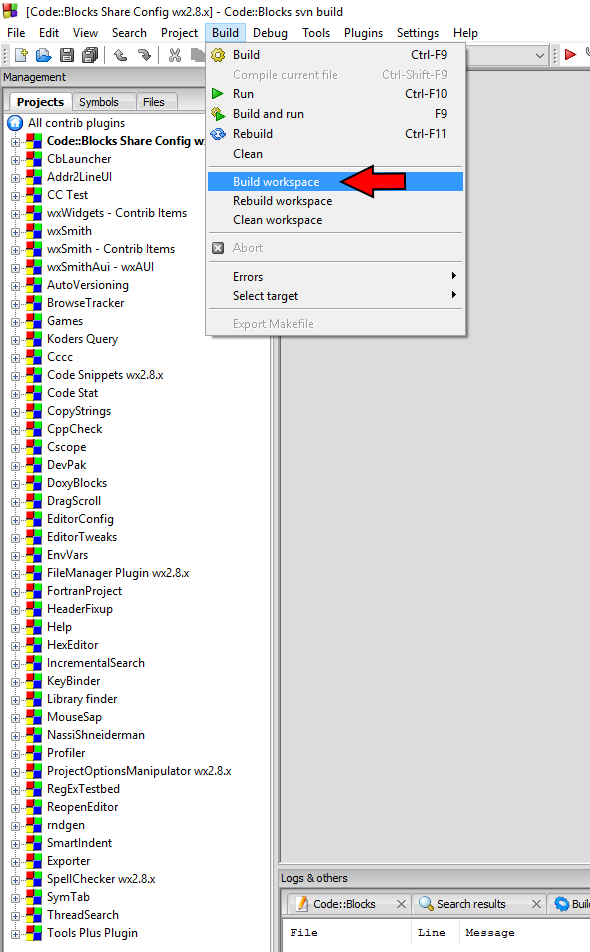
The workspace file ContribPlugins_wx31.workspace (or ContribPlugins_wx31_64.workspace for 64-bit compilation) contains the project files for all contributed plugins. Open that workspace and compile the plugins which you would like to use (or select "Build workspace" from the Build menu if you want them all).
The NassiShneiderman plugin has a dependency on the "Boost" library. If you do not wish to use that plugin and therefore not need the library, just right-click on that plugin and choose "close project."
Don't forget to run update_31.bat or update_31_64.bat again after building the contributed plugins.
Install Code::Blocks
Copy or move the output_31 or output_31_64 directory to where you want Code::Blocks to reside. Then you probably want to rename the directory to something else. You can also optionally right-click on codeblocks.exe and choose "Create shortcut" and then rename that shortcut to your liking and move it to another location such as your desktop for easy access.
If you want to run Code::Blocks on a machine without your compiler toolchain being in the PATH then you will likely have to include, in the same directory as the codeblocks.exe is fine, support .dll files from your compiler toolchain. The easiest way to determine the required files is to not have your compiler toolchain in your PATH and repeatedly run Code::Blocks and copy over each .dll it says is missing until all have been found.
