Creating a plugin which adds new item into wxSmith
What you should know before reading this tutorial
This tutorial is about creating new plugin which extends the functionality of wxSmith plugin. Before you start you should have wxWidgets and Code::Blocks compiled from source code. This step is required and you shouldn't continue as long as you're not interested in theoretical knowledge only. And you should read Creating a simple "Hello World" plugin, it's not necessary, but may help in many situations I haven't considered. I also assume that you know at least basics of C++ ;).
This tutorial was created on Windows environment but it should be quite easy to work simillar on Linux (at least by using Code::Blocks). We will try to add wxChart item into wxSmith. We won't cover all aspects of wxChart class here, but this tutorial may be a good starting point for creating more powerfull and sophisticated extensions :) It will show only some basics of wxSmith, so I hope to write few more tutorials covering other parts of this system.
Just need to make one more appointment - internal structure of wxSmith may change. I'll try to stay as close to current interface as it's possible, I also try not to write about things I'm planning to change (or I'll at least notify that it can be outdated soon), but can not grant that all your work will compile after a year (or maybe even few months). I'll try to keep these tutorials updated so you'll be able to get back here and find changes.
Creating new plugin
Let's start with new plugin. Most of informations here will be simillar to Creating a simple "Hello World" plugin, but there may be some small differences :)
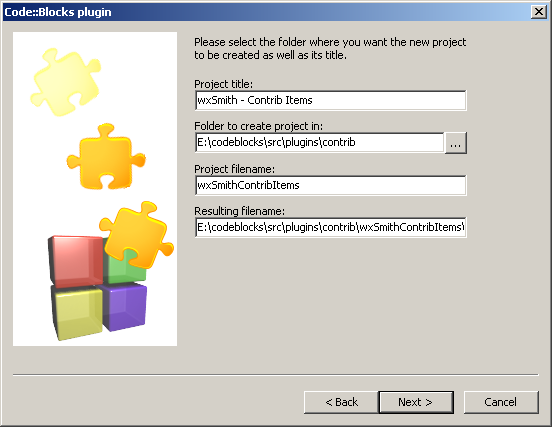
We start with new Code::Blocks plugin wizard. It's available in File->New->Project menu. We select Code::Blocks plugin there and start with following window:
I've named my plugin wxSmith - Contrib Items and placed it into contrib plugins folder. Choosing this folder probably wasn't a good idea. Any other folder, not related to Code::Blocks will work the same, and that should be your choice ;)
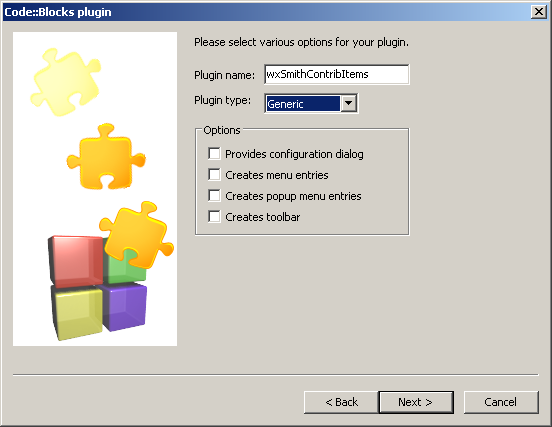
On the next wizard page we choose plugin type.
Because this plugin doesn't match any particular plugin type, we use Generic. In fact, our plugin won't do many do usual things other plugins do. It will use totally different scheme for extending wxSmith's functionality. But even though, we have to create it using some scheme to let Code::Blocks recognize and load it.
We follow the instructions in wizard and end up with new plugin.
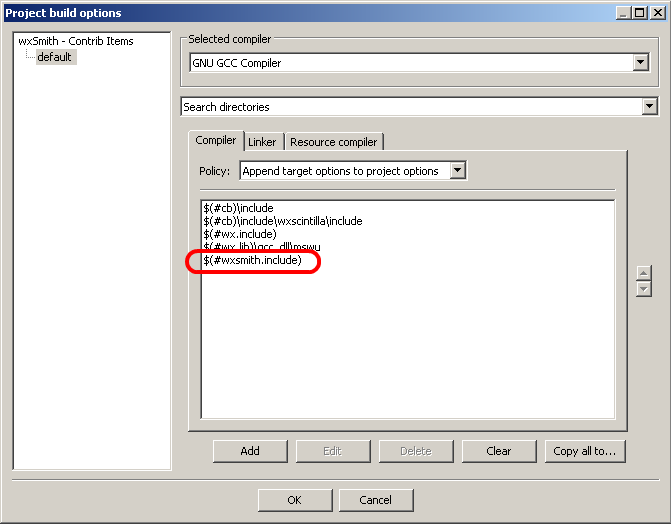
We should now be able to compile out project, but let's add binding to wxSmith first. We need to add wxSmith's directory into include locations list:
and it's output folder where .lib file will be placed:
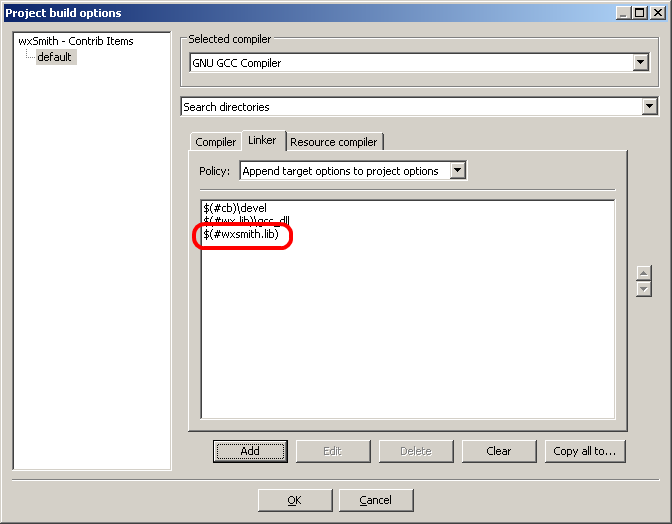
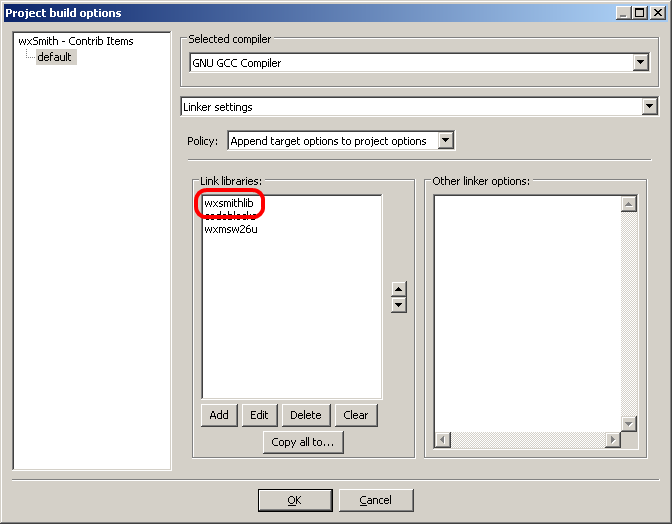
Last thing we need to add to bind our plugin into wxSmith is wxSmith's library:
Make sure it's on the top of list since it looks like MingW des care about the order in which libraries are linked.
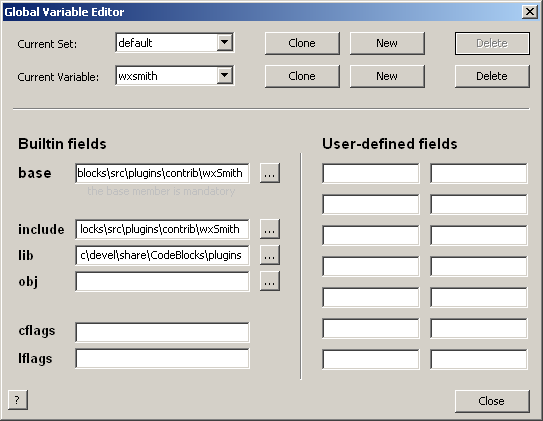
Now we close project's options and try to compile. Code::Blocks will ask for settings for wxSmith. We have to fill base path which is required, but also include and lib directories will be required since they are not as in usual cases:
Note that include dir points to wxSmith's directory and lib points to codeblocks\src\devel\share\CodeBlocks\plugins because that's where wxSmith will create it's .lib file.
If everything compiles fine, we can move to next step
Compiling in contrib widget
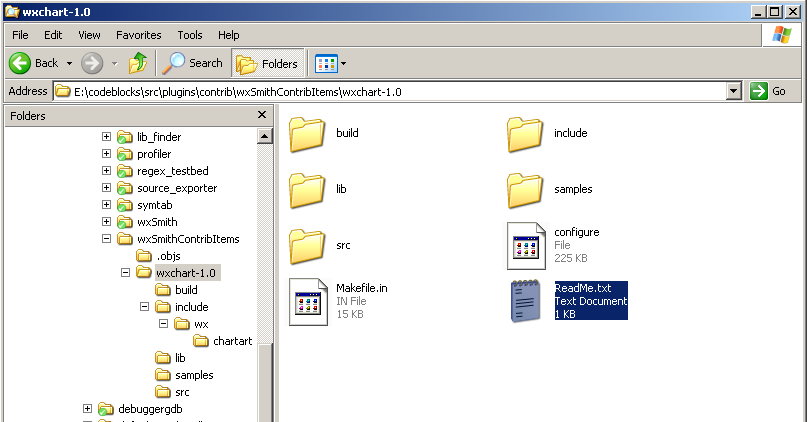
Now it's time to add widget we want to add into wxSmith right into our plugin. I have choosen wxChart hosted at wxCode, mostly because it will be easy to add and it looks promising :) First thing we need is source code. It's freely available at sourceforge (the link above). After unpacking it into our plugin's folder the directory structure should look like this:
I'd like to compile this item just as a part of plugin. Compiling it as external dll may lead to some problems because plugin would consist of many files. The easiest way is just to add wxChart's files into plugin's project.
Files we need are placed in wxchart-1.0\include\wx and wxchart-1.0\src (watch out for file in samples folder since it will try to create whole application).
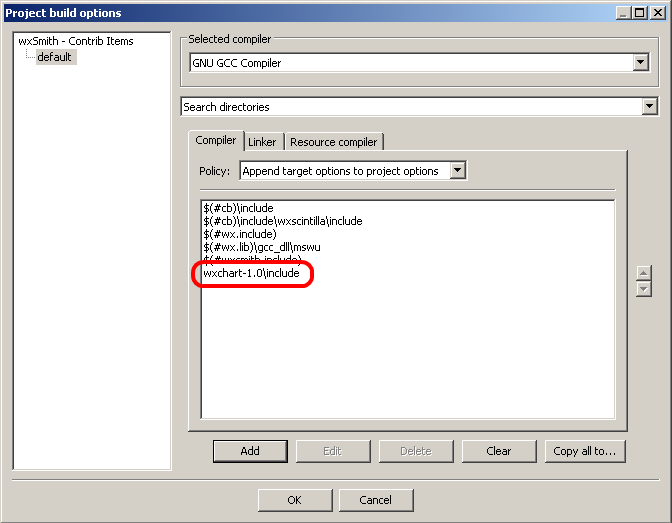
There's one more thing left to make wxChart compile with wxSmith. We have to add it's include dir into search paths:
After adding that, project should compile fine with wxChart compiled into it.
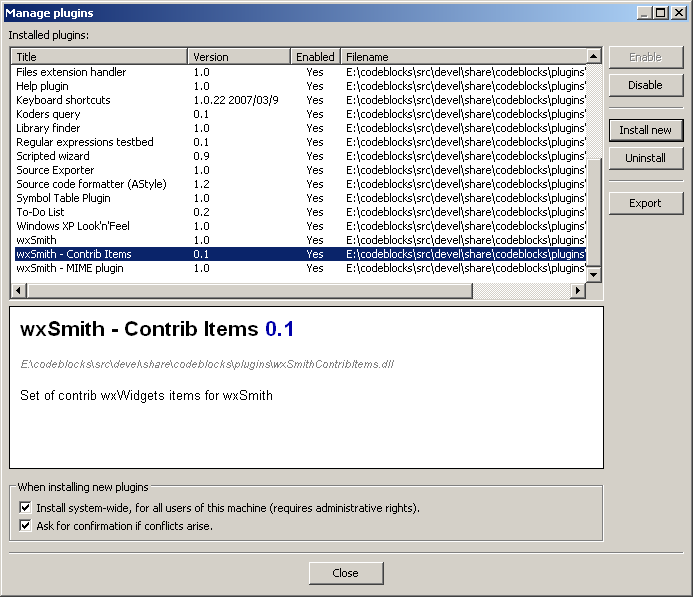
It this point I wanted to test whether our plugin still works. To do that I've installed it in plugin manager. I've got the proove that it all went OK:
Enabling new item inside wxSmith
Adding suporting class
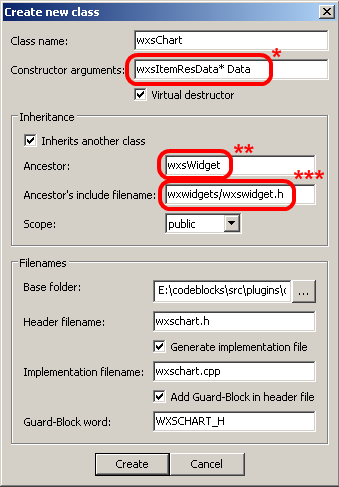
Now it's time to enable our item inside wxSmith. To do this first thing we have to do is to create new class that will support our wxChart. The name of class should be unique to prevent conflicts with other classes. Convention used in wxSmith is to replace wx in class names with wxs. So we create wxsChart class:
Note three extra settings which have to be added: consructor arguments (*), Ancestor(**) and Ancestor's include filename (***). Filling up these three fields make things much easier.
Item's images
Another thing we need for out item are icons. wxSmith require two icons for each item. First one should be 32x32 pixels (it's used for bigger version of palette and inside tools pane), second one 16x16 (used in resource tree and default small palette). I've created them from wxChart's screenshots using Paint.NET and converted them to XPM using GIMP. You may wonder why I want XPM files. The reason I've choosen that is that XPM files can be linked directly into source code with one single #include and they're directly supported inside wxBitmap and wxImage constructors. When we link images into dll, we won't have to take care about some extra image files required for plugin to work.
Creating global information objects
The only thing needed to register item inside wxSmith is to create one variable from template called wxsRegisterItem. Created object will automatically register and unregister item from wxSmith and will provide basic informations about item before it's created. Because it does require bitmaps, we will load xpm data first. After instantiating wxsRegisterItem template we also define set of used styles, but that will be described later.
namespace
{
    // Loading images from xpm files
    #include "images/wxchart16.xpm"
    #include "images/wxchart32.xpm"

    // This code provides basic informations about item and register
    // it inside wxSmith
    wxsRegisterItem<wxsChart> Reg(
        _T("wxChartCtrl"),                     // Class name
        wxsTWidget,                            // Item type
        _T("wxWindows"),                       // License
        _T("Paolo Gava"),                      // Author
        _T("paolo_gava@NOSPAM!@hotmail.com"),  // Author's email (in real plugin there's no need to do anti-spam tricks ;) )
        _T("http://wxcode.sourceforge.net/components/wxchart/"),    // Item's homepage
        _T("Contrib"),                         // Category in palette
        80,                                    // Priority in palette
        _T("Chart"),                           // Base part of names for new items
        wxsCPP,                                // List of coding languages supported by this item
        1, 0,                                  // Version
        wxBitmap(wxchart32_xpm),               // 32x32 bitmap
        wxBitmap(wxchart16_xpm),               // 16x16 bitmap
        false);                                // We do not allow this item inside XRC files

    // Defining styles
    WXS_ST_BEGIN(wxsChartStyles,_T("wxSIMPLE_BORDER"))
        WXS_ST_DEFAULTS()
    WXS_ST_END()
}
Important thing here is that we put all those informations inside nameless namespace. This will prevent redeclaration errors since usually all wxsRegisterItem instatiations produce variabe called Reg.
The arguments passed to wxsRegisterItem are easy to understand. Not all of them are used now, many are given just as information which may be used in future (f.ex. license may be used to check whether we can use item freely or not). Essential data fields which are used by wxSmith now are:
- Class name – name of item's class, will be used while generating declaration and for new operator, it's also identifier for item type, so there should not be two items with same name (only one of them will be available)
- Item type - type of item, for widgets like wxChart (they don't have children), it should be wxsTWidget. Type of item should match base class of class created to support this item. Other options are: wxsTContiner (f.ex. wxPanel), wxsTSizer, wxsTSpacer (only one item of this type is present) and wxsTool (f.ex. wxTimer). This tutorial concentrates on wxsTWidget classes so information presented here may be not enough to create other item types.
- Category in palette - giving empty category will prevent the item from being displayed, this name should not be translated in info (it must use _T() instead of _()), it will be translated later while generating palette
- Priority - Items with high values are placed on the left side of item palette and are easily accesible because of that
- Base part for variable names - it's used to generate variable name and identifier for items which don't have one or have invalid values
- Languages - set of languages supported by item, currently only wxsCPP is supported
- bitmaps - used in palette and resource browser
- XRC switch - if this value is true, this item is allowed in resources using XRC files. If it's false, item is not supported by XRC (which is usual case for contrib items). This value may be replaced by flags in future to allow supporting more characteristics of item. After switching to flags, code should still compile becuase XRC flag will have value 1 (value of true when it's converted to integer).
After registration object, we define item's styles. wxChart makes here two style sets: it's own made as enum STYLE (you should be carefull about that because it is really common name and it's defined globally in <chartctrl.h>) and flags (styles of window). When we talk about styles in wxSmith we always mean style argument as described in wxWidgets documentation (so here it will be flags). To help generating style set, wxSmith gives set of macros. Definition of set begins with WXS_ST_BEGIN. First argument is name of set, second is default style. WXS_ST_DEFAULTS() adds all default styles listed in wxWindow class help (not all may be used by particular item). Adding user-defined styles is done through WXS_ST(<style>) macro, but it wont be described with details in this tutorial. Definition of styles end with WXS_ST_END()
Constructor
Now we have all informations about item, so we can create out class. We had to declare these informations before supporting class' constructor because constructor require them. Here's some code from wxsChart:
wxsChart::wxsChart(wxsItemResData* Data):
    wxsWidget(
        Data,               // Data passed to constructor
        &Reg.Info,          // Info taken from Registering object previously created
        NULL,               // Structure describing events, we have no events for wxChart
        wxsChartStyles)     // Structure describing styles
{
}
And that's all for constructor. When we try to compile it now, compiler complains about pure virtual functions. So we have to implement them. List of functions is as follows:
- Generating source code for this item
void OnBuildCreatingCode(wxString& Code,const wxString& WindowParent,wxsCodingLang Language);
- Building preview of this item (either for editor or for full window preview)
wxObject* OnBuildPreview(wxWindow* Parent,long Flags);
- Enumerating extra properties of this widget
void OnEnumWidgetProperties(long Flags);
- Enumerating header files required by this widget
void OnEnumDeclFiles(wxArrayString& Decl,wxArrayString& Def,wxsCodingLang Language);
Let's take a look at implementations of these functions. First code function generating source code of item;
void wxsChart::OnBuildCreatingCode(wxString& Code,const wxString& WindowParent,
                                   wxsCodingLang Language)
{
    switch ( Language )
    {
        case wxsCPP:
            Codef(_T("%C(%W,%I,DEFAULT_STYLE,%P,%S,%T);\n"));
            break;

        default:
            wxsCodeMarks::Unknown(_T("wxsChart::OnBuildCreatingCode"),Language);
    }
}
Firs thing to mention is that this function may support multiple languages. Currently there's only CPP supported, but that will be expanded in future. The structure
   switch ( Language )
   {
       case wxsCPP:
           ... Add code here ...
           break;
       default:
           wxsCodeMarks::Unknown(_T("<Function name>"),Language);
   }
is common for all functions generating source code. The wxsCodeMarks::Unknown call is not obligatory, but may ease finding unfinished parts of source code when new languages will be added.
Code generation uses Codef() function which is a helper when generating source code. It works simillar to Printf function but has different formating characters in most cases and support for standard format characters ( like %s or %d ) is very simplified. In the code above following formating characters were used:
- %C – creation prefix, it usually expands to <VARIABLE> = new <CLASS>, but may also be <VARIABLE>.Create (for instances instead of pointers, this must be used carefully since not all classes provide Crate function simillar to constructor) or simply Create (when this is root item – f.ex. wxDialog and we're initializing the class itself)
- %W – pointer to parent Window
- %I – current Identifier
- %P – item's Position
- %S – item's Size
- %T – item's sTyle
Of course one may generate code by hand, since all data available in Codef can be accessed directly. For example, variable for current item may be taken by calling GetVarName() function.
Next comes function generating preview – it should be similar to function generating code but the output should be object, not code.
wxObject* wxsChart::OnBuildPreview(wxWindow* Parent,long Flags) {
return new wxChartCtrl(Parent,GetId(),DEFAULT_STYLE,Pos(Parent),Size(Parent),Style());
}
The important thing is Flags argument, currently it contain one flag: pfExact which say whether this is preview generated for editor or real preview.
To check when preview is built to be used in preview, use:
if ( !(Flags&pfExact) ) { ... do some code ... }
And analogically to check when it will be used in preview window, use:
if ( Flags&pfExact ) { ... do some code ... }
This may be used to optimize the performance for some items which require time consuming initialization (f.ex. WxHtmlWindow which may request to load some web page).
Third function is coded as follows:
void wxsChart::OnEnumWidgetProperties(long Flags)
{
}
It's empty because we do not provide our custom properties now. Properties will be explained in other tutorial.
The last function is:
void wxsChart::OnEnumDeclFiles(wxArrayString& Decl,wxArrayString& Def,wxsCodingLang Language)
{
    switch ( Language )
    {
        case wxsCPP: Decl.Add(_T("<wx/chart.h>")); break;
        default: wxsCodeMarks::Unknown(_T("wxsChart::OnEnumDeclFiles"),Language);
    }
}
It's used to enumerate enteries of units with declaration data, which in C++ simply means header files. There are two arrays which can be used:
- Decl which should be filled with units required for declaration of class – f.ex. header files of item
- Def which should be filled with units required for definition of class – mostly it should contain files with classes needed only when creating class. F.ex. font class may be used when building dialog, but it's not required for class declaration (because of some reasons <wx/font.h> header is always included, but it shows the point)
Now it's time to compile out plugin. We only need to add #include <wx/chartctrl.h> to include chart control itseld and voila, compiles fine. So, let's test it now in real C::B environment.
Testing of new plugin
New control is on the palette, it can be added but it shows some error messages about missing bitmaps in .rc file. First I tried to add them into some local rc file, but it didn't work (AFAIK Windows tries to look for resources inside exe file only). So I've done it in some rather dirty matter: I've forced to use XPM files instead of windows resources. It required following changes in chartctrl.cpp:
//#if !defined(__WXMSW__) && !defined(__WXPM__)
    #include "wx/chartart/chart_zin.xpm"
    #include "wx/chartart/chart_zot.xpm"
//#endif

...

//        #if defined(__WXMSW__) || defined(__WXPM__)
//            return wxBitmap(wxT("chart_zin_bmp"), wxBITMAP_TYPE_RESOURCE);
//        #else
            return wxBitmap( chart_zin_xpm );
//        #endif

...

//        #if defined(__WXMSW__) || defined(__WXPM__)
//            return wxBitmap(wxT("chart_zot_bmp"), wxBITMAP_TYPE_RESOURCE);
//        #else
            return wxBitmap( chart_zot_xpm );
//        #endif
(lines in bold were commented out).
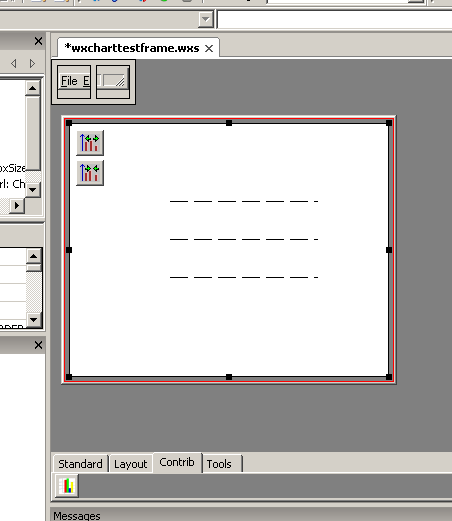
After recompiling we got new item working without problems:
Some tips
In this example we have created nameless namespace to hide structures containing informatino about item. To fully avoid the risk of doubled symbols, whole class could be put inside such nested namespace. That can be done because this class is not accessed outside anywhere directly as wxsChart. Whole wxSmith see it as wxsWidget. Drawback of this solution is that debugger may not see content of nameless namespaces.
